
Hi it’s Bobbi Lemanski here, just rolling in with my gnomies! Look what these uber cool gnomes are up to today. It’s time to get ready for the holidays and first up is getting the tree! My card today features the following Honey Bee Stamps products (click to view / purchase):
- – Gnome Place Like Home stamp and die sets
- – Car Show stamp and die sets
- – Bee Bold Alphabet dies set
- – Snowy Day Background Stencil
Additional Supplies used and available at Honey Bee:
- – Neenah 80-lb cardstock for the card front and layers
- – Neenah 110-lb cardstock for a sturdy card base
- – Tombow Double Sided 3D Foam Tape
- – MISTI stamping tool
- – Uni-ball Signo White Gel Pen
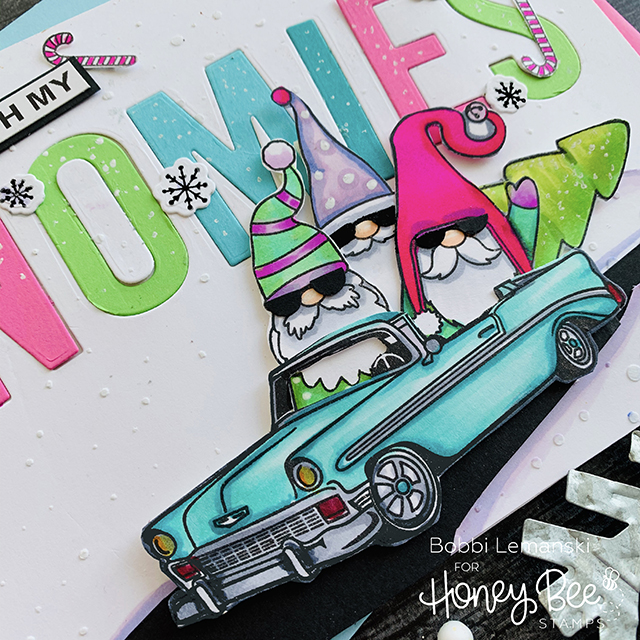
Can you have too much fun with a stamp set? I don’t think so! I got this “rolling” idea one night before falling asleep (my best thinking time) and couldn’t wait to get up and see if I could fit these cute gnomes in a car. Well, I managed to fit three and a tree! To make this card, I started by stamping the gnomes, tree, candy canes and snowflakes using my MISTI stamping tool. I also stamped that vintage car. All the images were colored using Copic Sketch Markers and die cut using their coordinating die sets (gnome dies /car dies). Notice that I turned the car into a convertible by cutting off the roof to make room for the gnomes later. The images were set aside while I worked on the card front background.
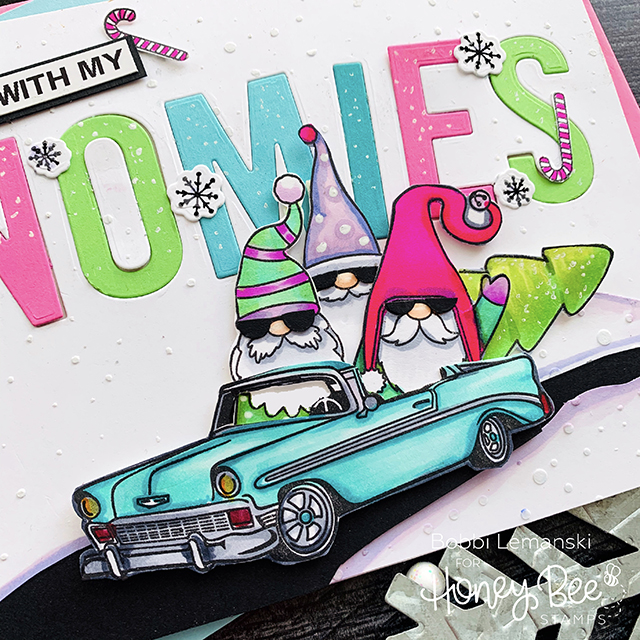
To create the background, I started with a 5″ X 7″ card front cut from the 80-lb cardstock. I used the Snowy Day Stencil and embossing paste to create the snowy, textural background. Once it was dry, I laid out the letters from the Bee Bold Alphabet die set to spell, “GNOMIES.” I placed the letter dies towards the top half of the landscape-oriented card to make room for the car/gnome scene below and ran them through my Gemini die cutting machine. The letters were also cut out of solid cardstock in pink, green, teal, and aqua. The card front was attached to the 110-lb card base (10″ X 7″ scored at 5″ to create a 5″ X 7″ card) and the colored letters were set in place and adhered with glue for an inset look. Little white dots were added to the letters using my white gel pen. The dots mimic falling snow to match the background.
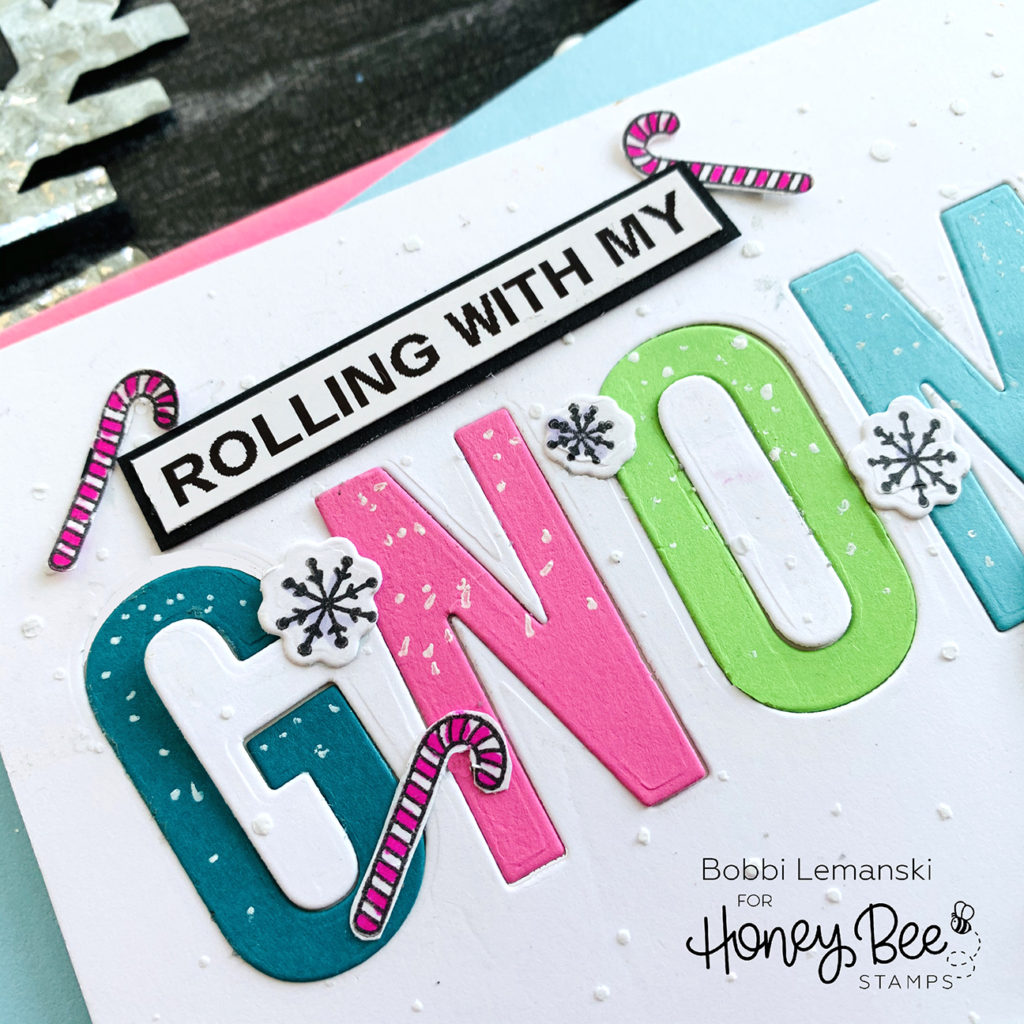
Whenever I combine sets in different ways than intended, I usually need a very specific phrase that is not included in the stamp sets. Sometimes, I have to create a custom phrase like I did here. To make the phrase, “ROLLING WITH MY,” I used my label maker. It’s easy-peasy. You could also print it off on your laptop, but I opted for the quicker solution. I like the strong black letters of the label, too. They “connect” to the black road below. The custom phrase was matted with black cardstock to add weight to the phrase. I attached it above the large letters. Candy canes and snowflakes were added to the phrase and letters for accents.
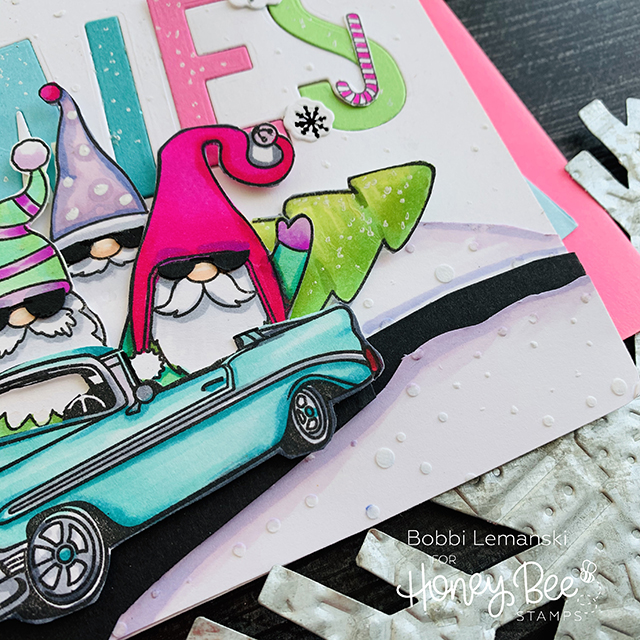
Now let’s get rolling on the scene… The gnomes were cropped and placed inside the car. I added the tree to the back. I ended up fussy cutting out the car windshield to allow more of the passenger gnome to show through. I needed something to “ground” the car, so I added a curved road, hand-cut from black cardstock and sandwiched it between two small snowy hills. I added Copic BV00 shading to the edges of the snow hills to define them from the snowy sky. The car was mounted on the road using 3D foam tape for dimension.
Now the final touch… let’s make these gnomes uber cool! I cut small black circles using a small circle punch and cut them in half to make the sunglasses. I attached the faux “shades” to all three gnomies to complete their swanky look. Yep, little black circles is all they needed to roll these snow hills in style!
Thanks for “rolling” in today to check out this card. You can find me on my blog at BobbiHartDesign.com, Instagram as @BobbiHartDesign and on Facebook as BobbiHartDesign.
Bobbi Hartmann Lemanski, Bobbi Hart♥ Design, Adding h♥art into every design
6 responses to “Rolling With My Gnomies!”
LOVE IT!!!
Thanks, Carrie! It’s always fun to mix sets in new ways!
Super cool card !
Thank you! I had fun with this one. 🙂
Oh too cute!
Love the shades.
Carla from
Thanks. I think the shades make these gnomes so adorable! They kind of look like ZZ Top! Heehee