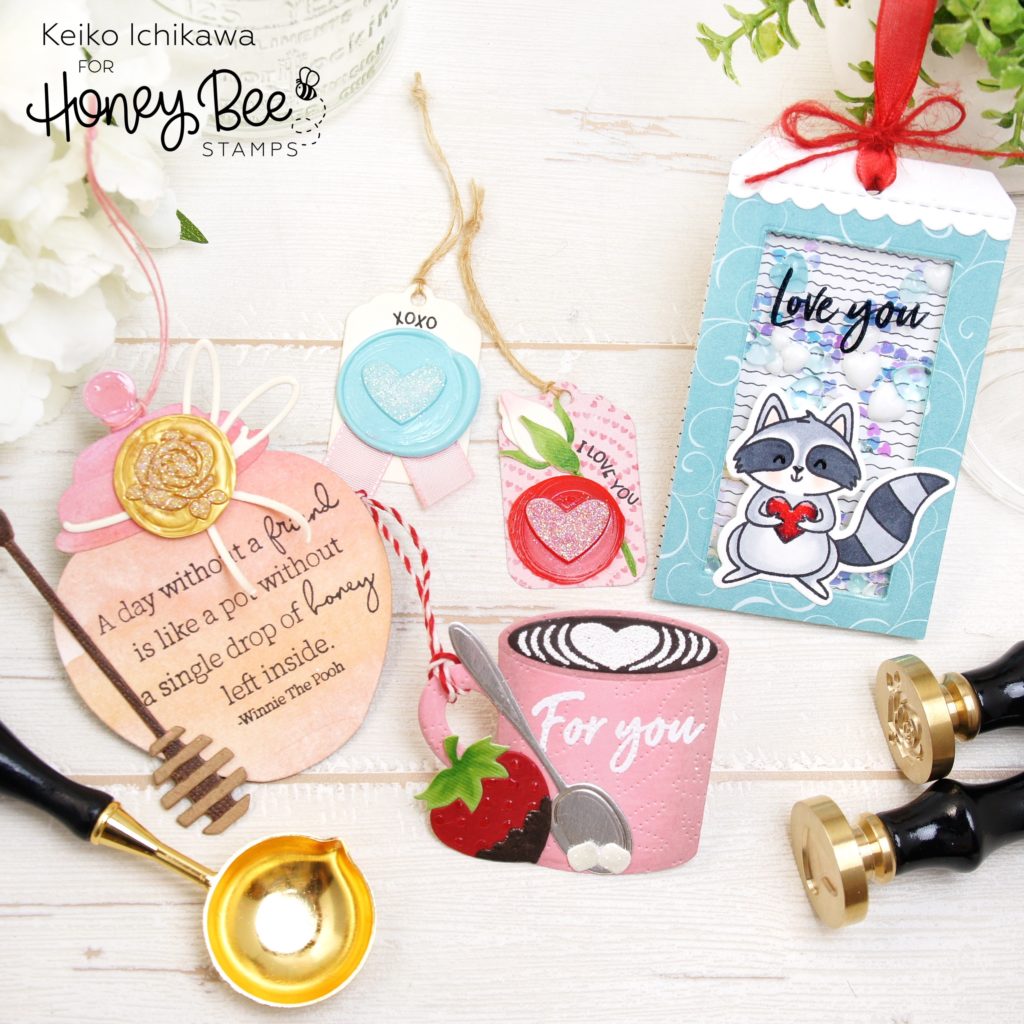
Happy brand new week friends! It’s Keiko from Happy Tree Studio and I have these fun tags to share with you all. You can add “TO” and “FROM” or your personal message on the back. I used various stamp, dies, and also brand new wax melt products from Honey Bee! I have never used wax seal before, but it was fun (and easy) so I made a bunch of them in different colors and designs so I can use them in my future projects too. I used my heat tool to melt the wax, but you can use candles or hot foil system! Click HERE to check out DT member Ilda’s blog for the detailed tutorial on how to use the foil machine (I wish I had one!!). She is a genius! Now let’s look at the tags one by one.
*Texts in blue is a direct link to the Honey Bee Stamps store. You can click on them to see the details.
Shaker Tag
<Supplies>
Tag Builder (die)
Stolen My Heart (stamp & die)
Love Enclosed (stamp) for the sentiment
Sweet Stacks: Rectangles (die) for the window
Scallop A2 (die)
Hugs And Kisses (paper pad)
Pure Acrylic Hearts Mix
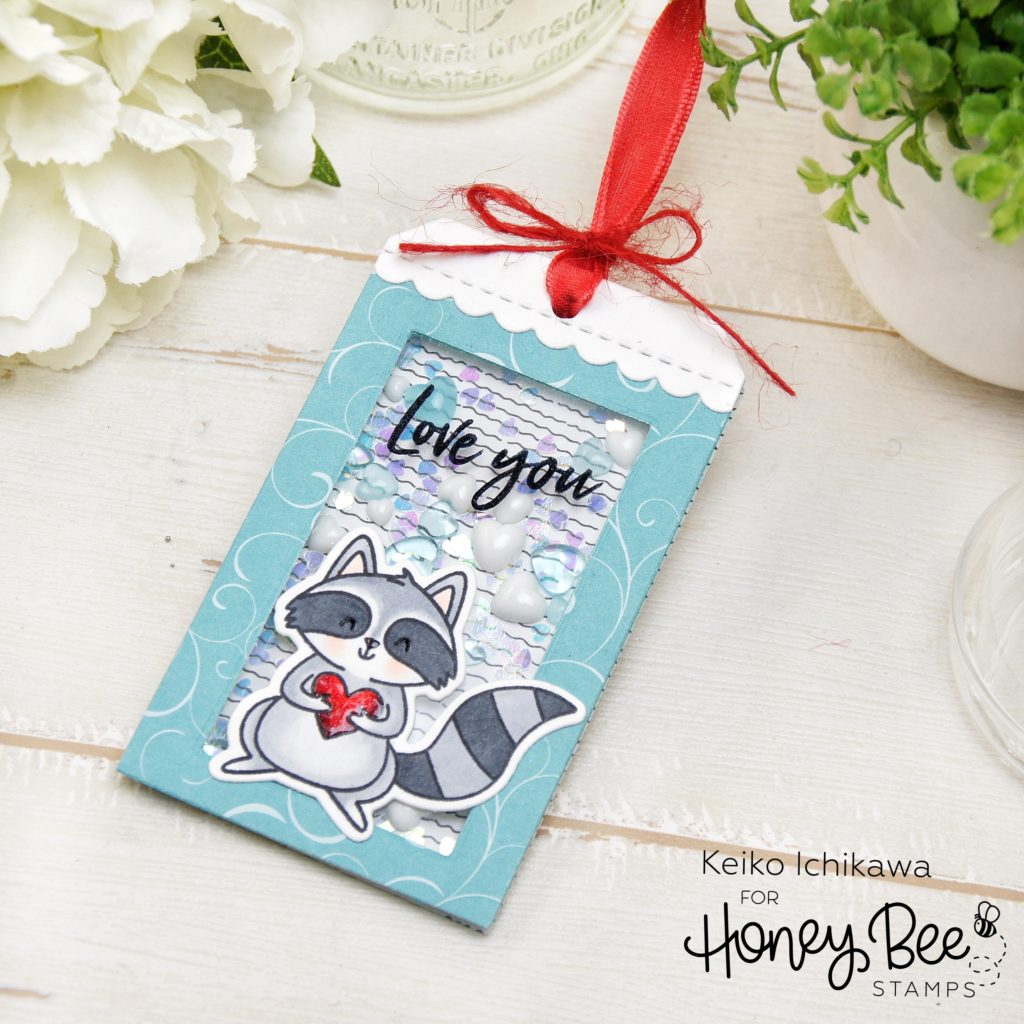
I die cut the tag shape twice from pattern papers (one for the front and the other for the back) and another two from card stocks and adhered the pattern paper tags to the card stock ones to make them sturdy. I then die cut out the window from the front panel using a rectangle die and added an acetate to the back. The sentiment was stamped on the acetate with StazOn ink. Then I stamped the cute raccoon, colored him with my Copic markers and die cut out with the coordinating die. To complete the shaker, I applied two layers of foam tapes on the back of the frame piece and added some shaker bits before adhering to the back panel. TIP: I glued some of the hearts to the background so not all the hearts drop to the bottom. To finish off the tag, I added the scallop trim (die cut using a scallop die and the tag die) and thread some ribbon and tied with some twine.
Honey Pot Shaped Tag
<Supplies>
Honey Jar Paper Piercing (die)
Just Beecause (stamp) for the sentiment
Summer Stems (paper pad)
All That Glitters Wax Melts
Wax Stamper: Rose
Wax Melting Spoon
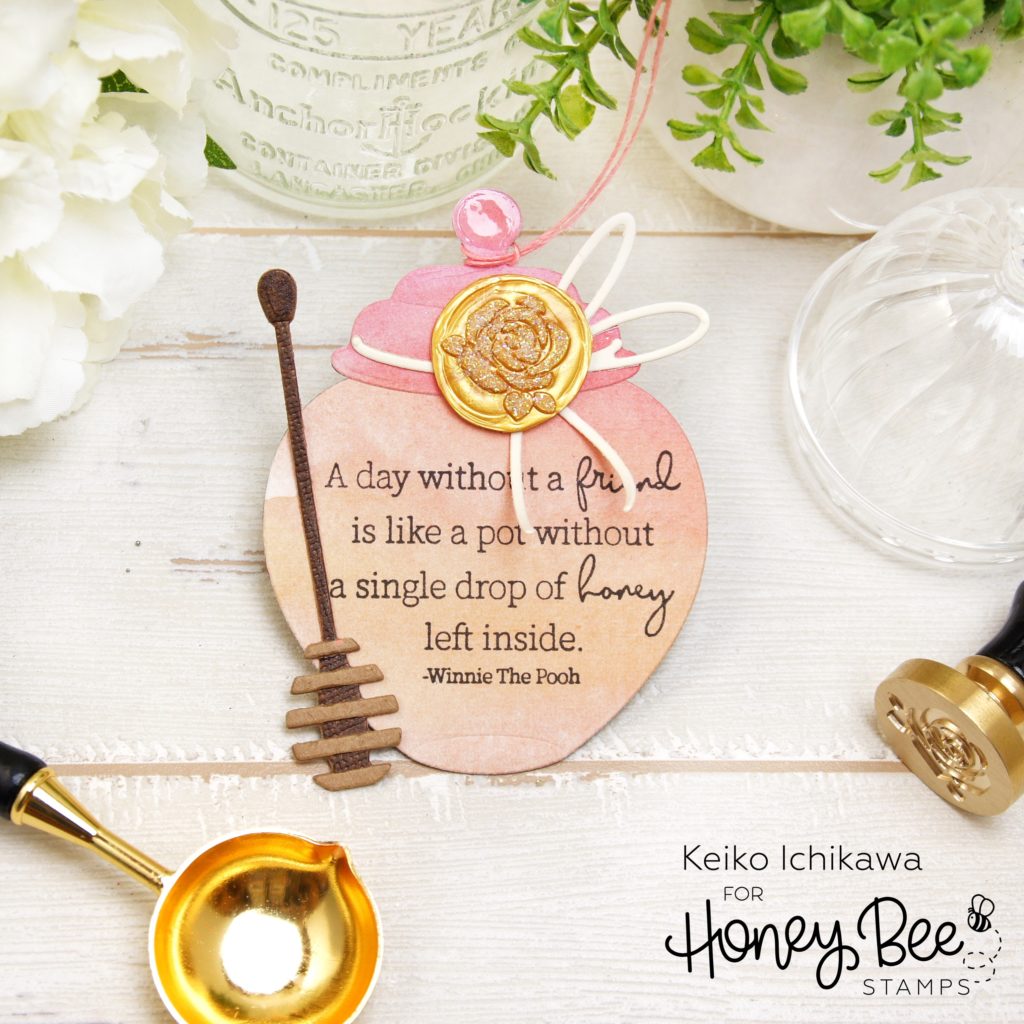
I die cut all the pieces from various card stocks and stamped the sentiment with black ink. TIP: When using a pattern paper, I usually add a card stock layer to the back to make them a little more substantial. I then adhered one of the wax seal I made with strong liquid glue and tied some twine to the top. TIP: The wax seal looks stunning as is, but I added Glossy Accents to the rose and sprinkled on white glitter to make it stand out a little more.
Mug Shaped Tag
<Supplies>
Mugs & Kisses (die)
Hug In A Mug (stamp) for the coffee art
Freshly Picked (die) for the strawberry
Love Enclosed (stamp) for the sentiment
Fluttering Hearts Pierced Cover Plate (die)
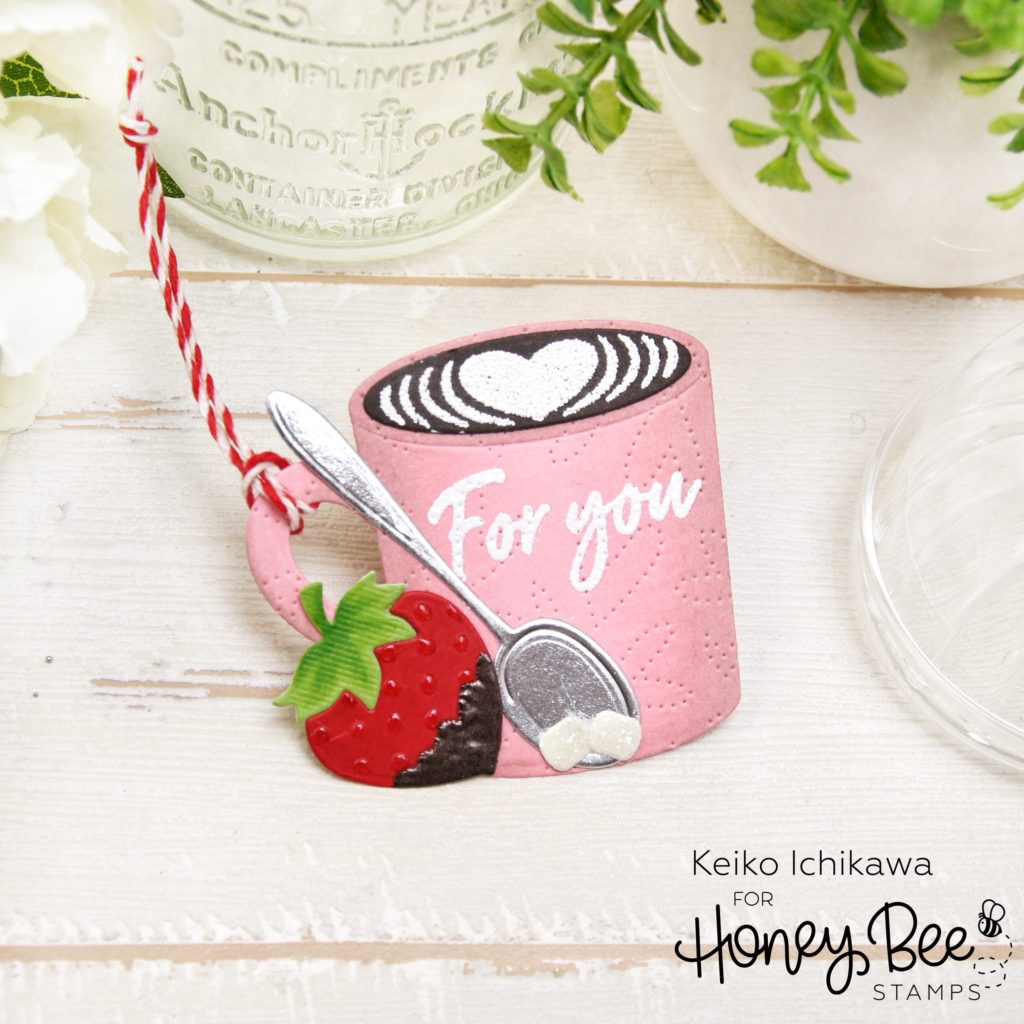
I die cut all the elements from various card stocks and heat embossed the coffee art using white puff embossing powder. The sentiment is also heat embossed on the mug. To add some texture to the mug, I run it through the die cut machine with the pierced cover plate die. I added Glossy Accents to the strawberry to mimic the seeds and the “chocolate” is brown embossing powder. TIP: I applied two layers to achieve the thick chocolate look and love the result!
Mini Tags
<Supplies>
Tag Builder (die)
Lovely Layers: Roses (die)
Hugs & Kisses Wax Melts
Wax Stamper: Heart
Wax Melting Spoon
Mae The Mouse (stamp) for the sentiments
Hugs & Kisses (paper pad)
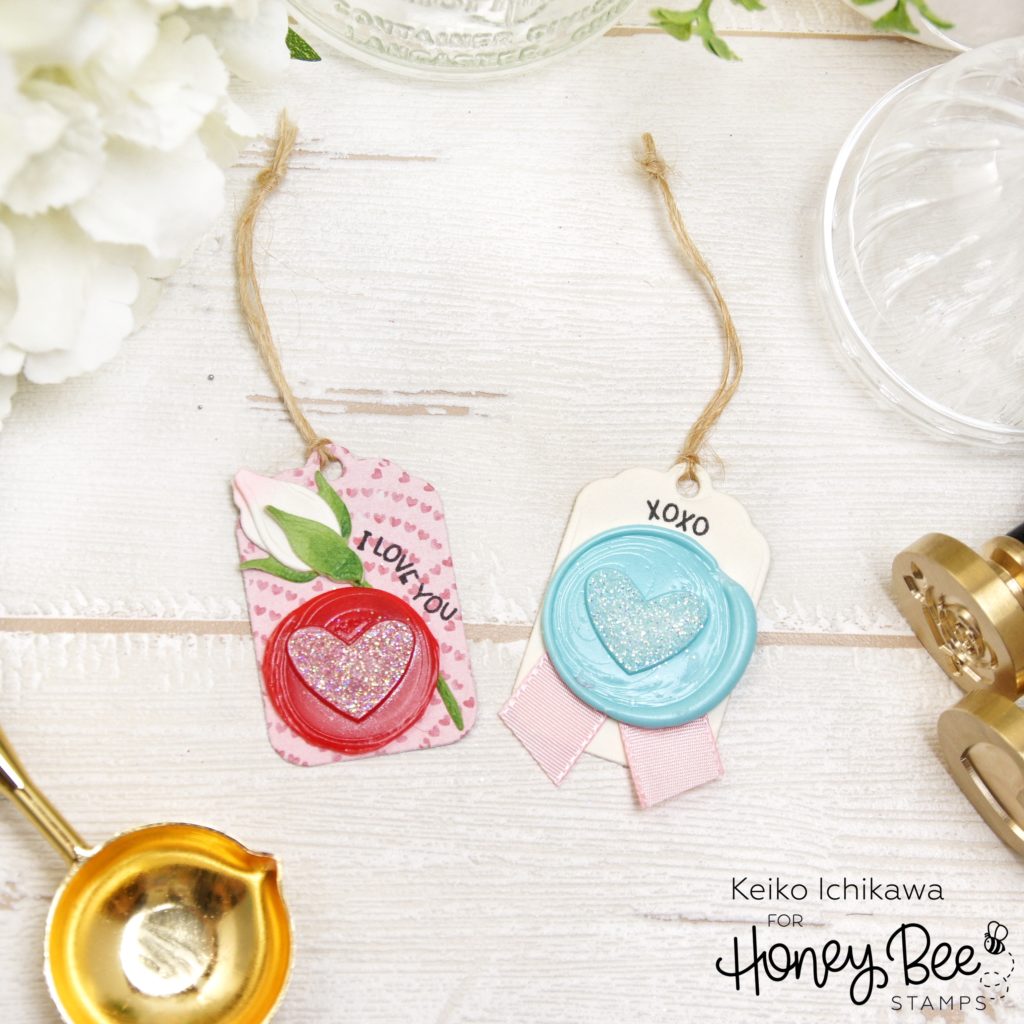
These are very simple and tiny but so adorable! I just die cut the tags and added die cut rose bud and wax seals to decorate them. I found these tiny sentiment stamps and they worked perfectly. TIP: For the red wax seal, I did not want to cover up the rose stem completely, so I trimmed the wax a bit with my scissors.
Thank you so much for stopping by today! Have a wonderful week!!
