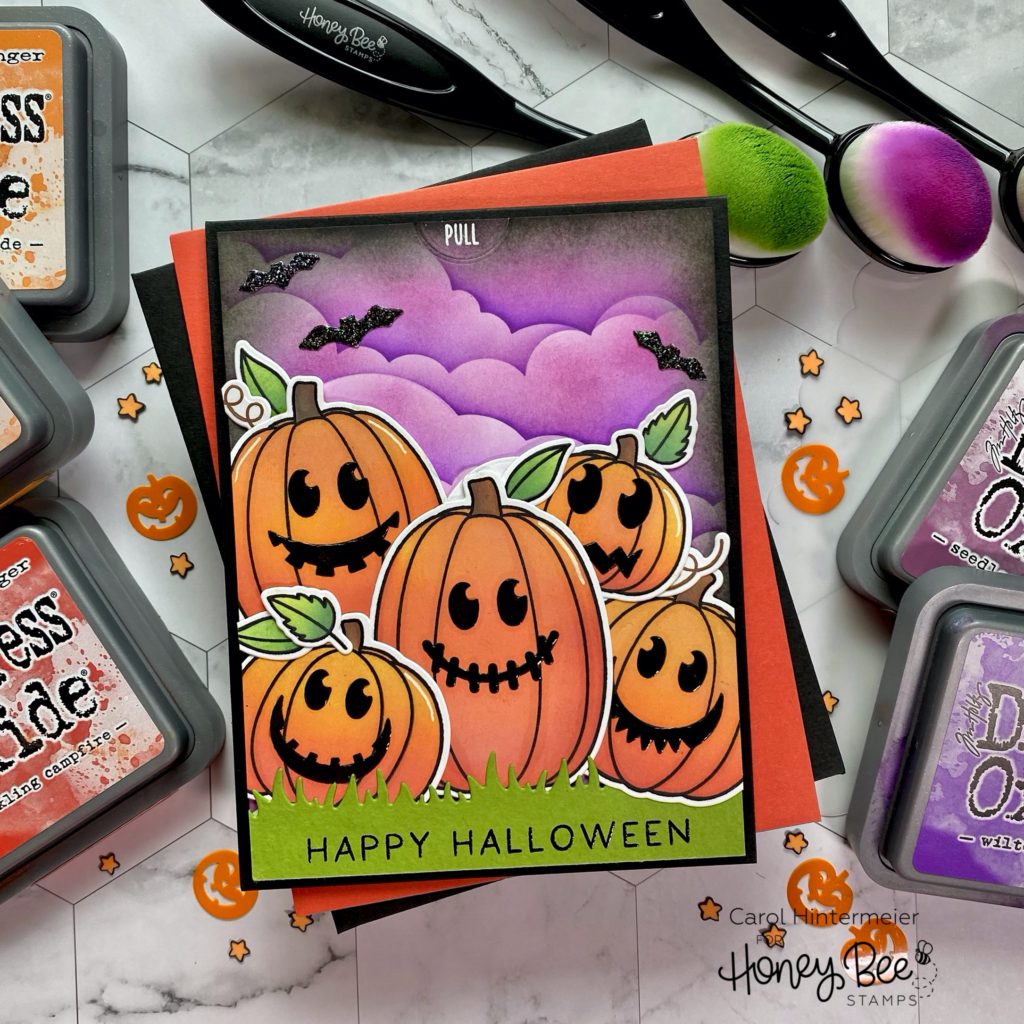
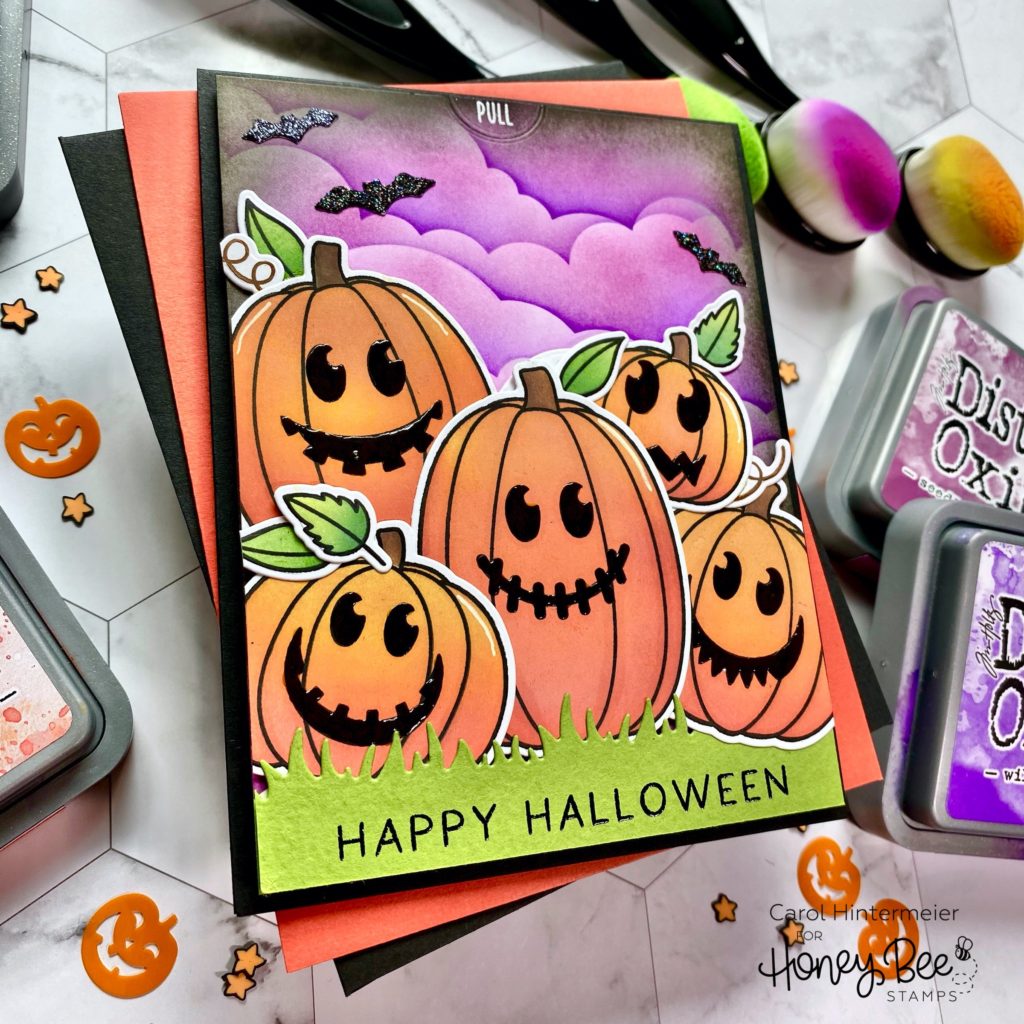
Happy Thursday friends! I hope your week has been going well. Today I have a fun surprise slider card using some fabulous older sets. The main ones I’ve used are Pumpkin Patch stamps and Honey Cuts; The Name’s Jack stamps and Honey Cuts; and FaBOOlous Sentiments. This is the first surprise slider card I’ve ever made and I really had fun with it! This is the card as it would look when removed from the envelope:
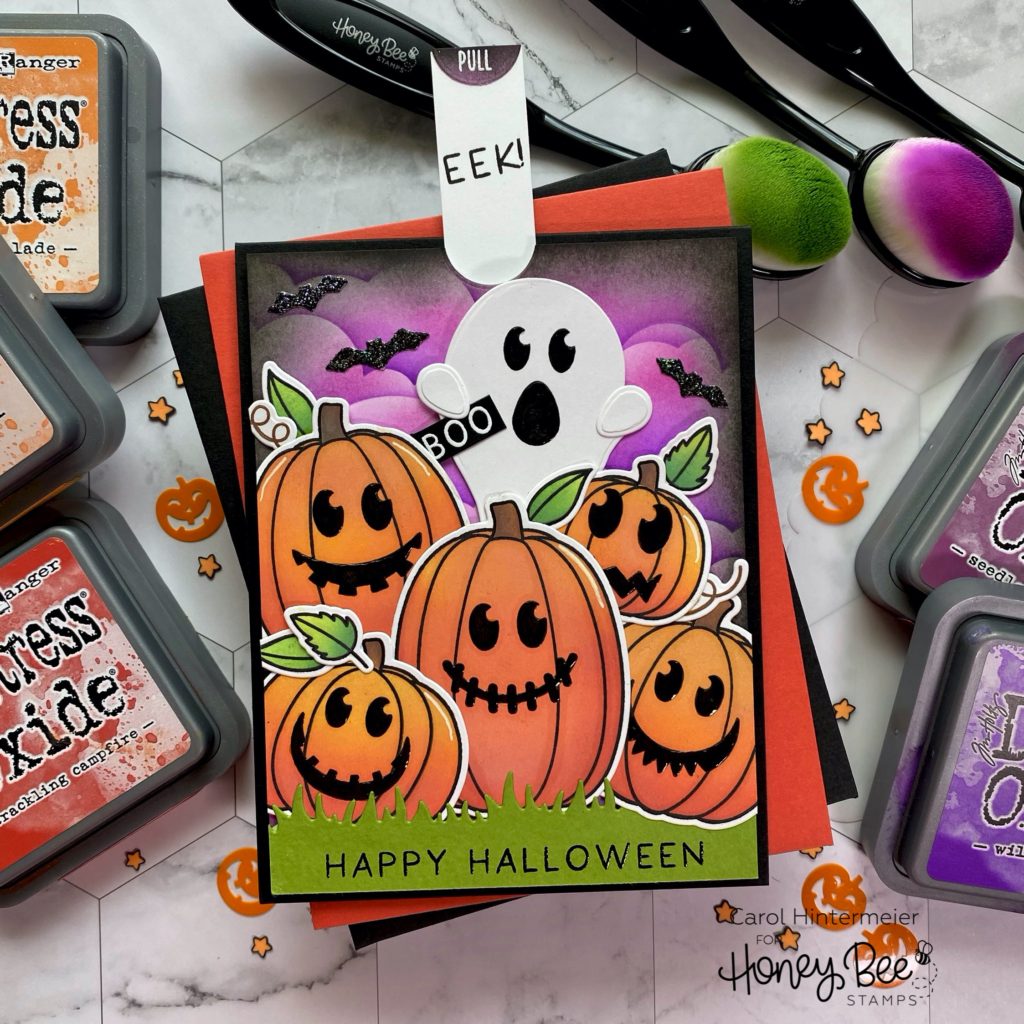
Next is the surprise when the tab is pulled up!
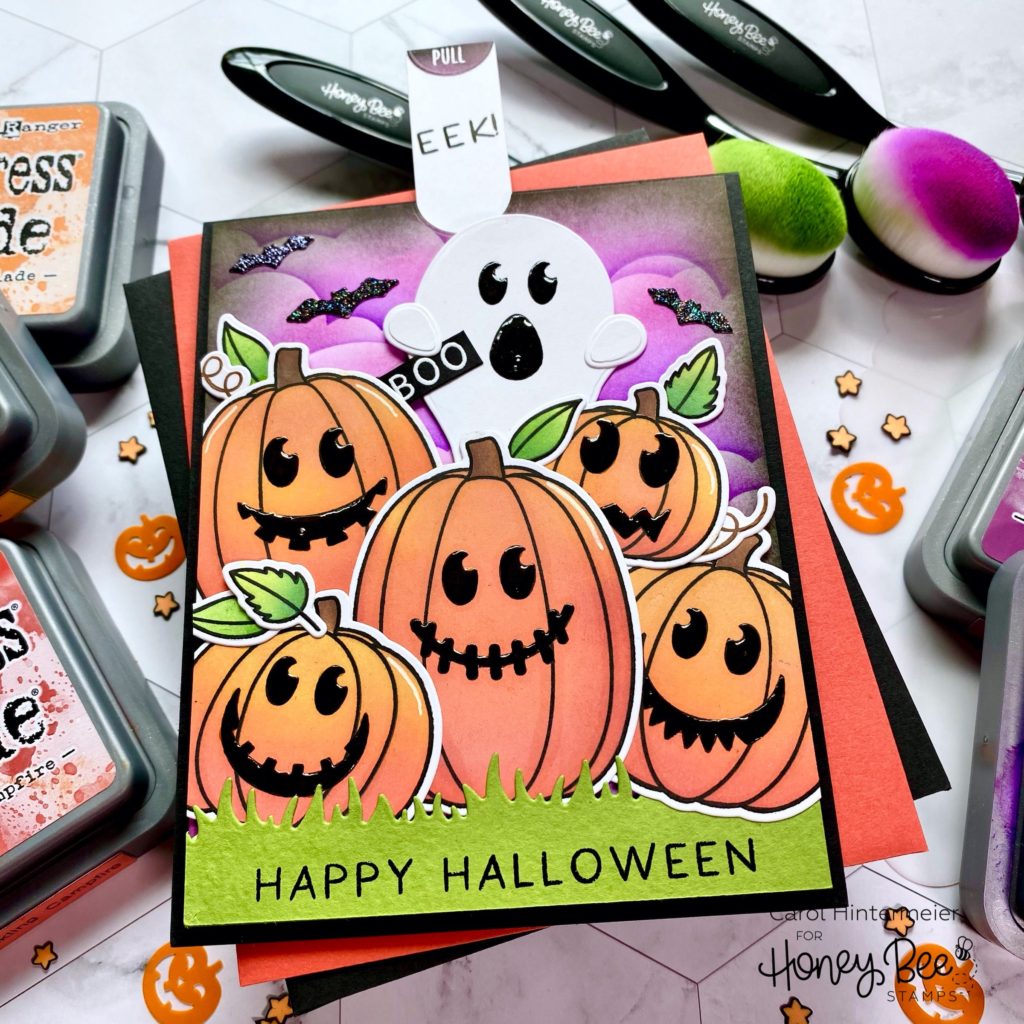
So much fun, right?!! Lets create the fun elements of the card:
- Using a 4″ x 5-¼” piece of white card stock, stencil clouds with the cloud stencil from the Outdoor Scene Builder stencil set. I used the Background Blender Brushes and these Distress Oxide Inks: Wilted Violet, Seedless Preserves, and Black Soot.
- I used ½” circle die from my stash to cut a half circle from the center of the top edge of the card. Keep this half circle and stamp “pull” from the One-of-A-Kind set in Versamark, add white embossing powder and heat set.
- Die cut some bats from black glitter card, which are from the Haunted House Add On Honey Cuts.
- Die cut green card stock with the Grass Border Honey Cut. Stamp the sentiment from the FaBOOlous Sentiments set in Versamark, add black embossing powder and heat set.
- Stamp the pumpkins, leaves, and vines from the Pumpkin Patch set. Use the Pumpkin Patch stencil to color everything with Distress Oxide Inks. I love these Blender Brushes for this. I used Crackling Campfire, Carved Pumpkin, Spiced Marmalade, Mowed Lawn, Twisted Citron and Vintage Photo. I used the jack-o-lantern faces from The Name’s Jack set and added the faces in Versafine Black Onyx ink. Die cut them with the coordinating Honey Cuts.
- Die cut the ghost from The Names’s Jack Honey Cuts. Stamp a ghost face from the stamp set in black ink. Die cut two of the little arms and adhere with a couple drops of Bee Creative glue on the top edges.
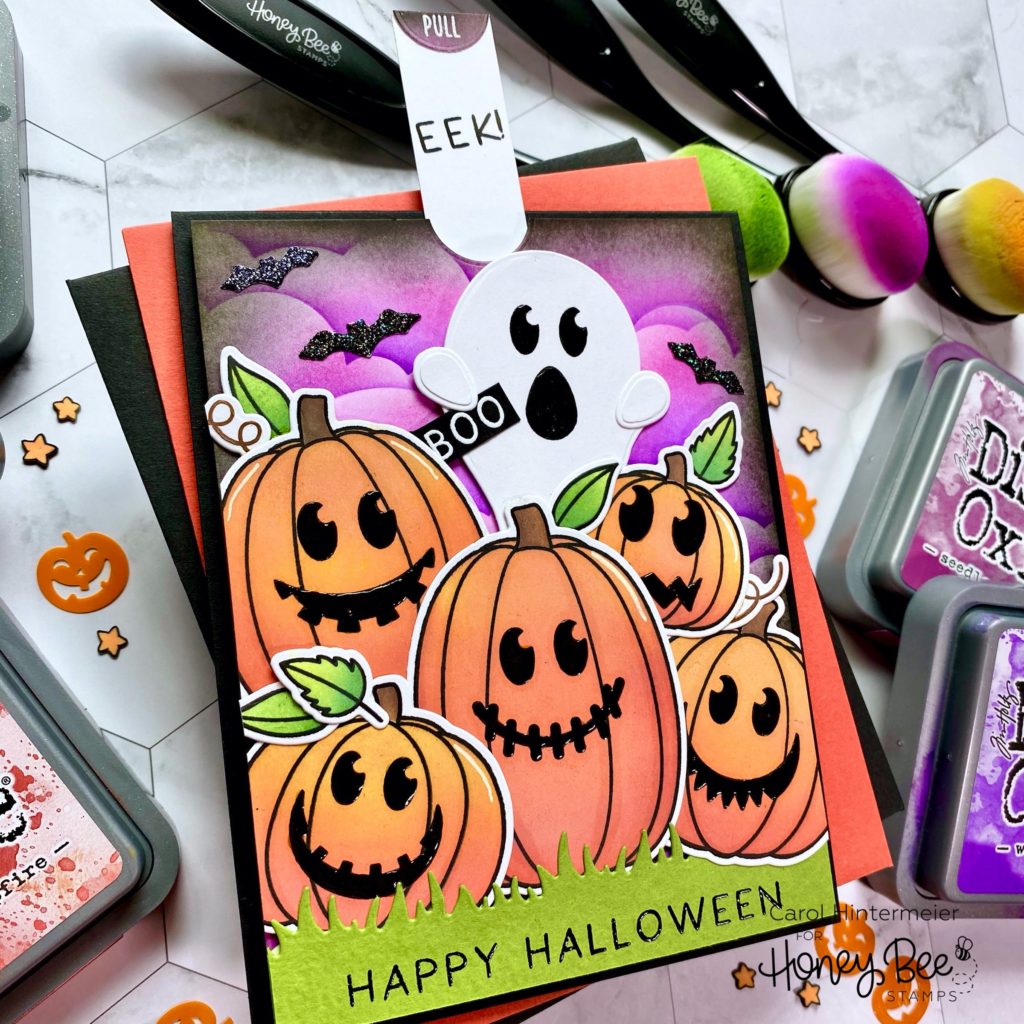
- Before I worked on the slider portion, I needed to get my pumpkins arranged to make sure they would cover the ghost in its hidden position. When I had them arranged with the grass border, I put a piece of Press N Seal over them, flipped it over, and used the Bee Creative glue to adhere them where they overlapped. Trim any pieces that overlap the 4″ cloud base.
- To create the slider channel, I used my craft knife and cut a 3/8″ channel in the cloud base. (I did some researching on Pinterest and YouTube for ways to do this.) If you have Honey Bee’s Straight Interactive Slider Honey Cuts, this would be super easy!
- Next I die cut two ½” circles with a die from my stash. I added a round foam circle to one of the die cut circles, placed it behind the channel, and adhered the other circle on top.
- I put the pumpkin scene on the cloud layer (without adhering) and decided where the ghost needed to be adhered on the circle so it will be hidden behind the pumpkins with the pull strip down. When I figured it out, I adhered the ghost.
- Next I cut a ¾” x 4″ white card stock strip and adhered one end of it to the circle on the back. While it’s in the down position, I trimmed the extra length even with the top of the card layer. Now I adhered the “pull” half circle at the top.
- Add foam tape on the back to either side of the pull strip and around the edges too.
- I stamped “EEK” on the pull strip in Versafine Onyx Black ink.
- Next I stamped “BOO” onto some black card stock in Versamark and embossed it with white embossing powder. I trimmed it into a rectangle shape and adhered it under the ghost’s arm.
- Adhere the panel to a black A2 card base.
I finished up the card by adhering the bats so they would still be seen when the ghost is popped up. I also added Glossy Accents to all of the eyes and mouths of the pumpkins and ghost.
I hope you’ve enjoyed my card today and are inspired to try this fun slider technique! Stay well, and stay crafty, my friends!
P.S.: Be sure to come back to the blog tomorrow as it is the first day of sneak peeks of the Autumn Afternoon release! You will get to see some beautiful design team creations using the new products!
4 responses to “Jack-O-Lantern Surprise Card”
Beautifully done! Love your colors.
Thank you Sarah! It was a fun card to make!
This is the sweetest surprise. My grandkids would love this so much…
Thank you so much Anne! I’m sure kids of all ages would like this! Haha! I sure appreciate your kindness!