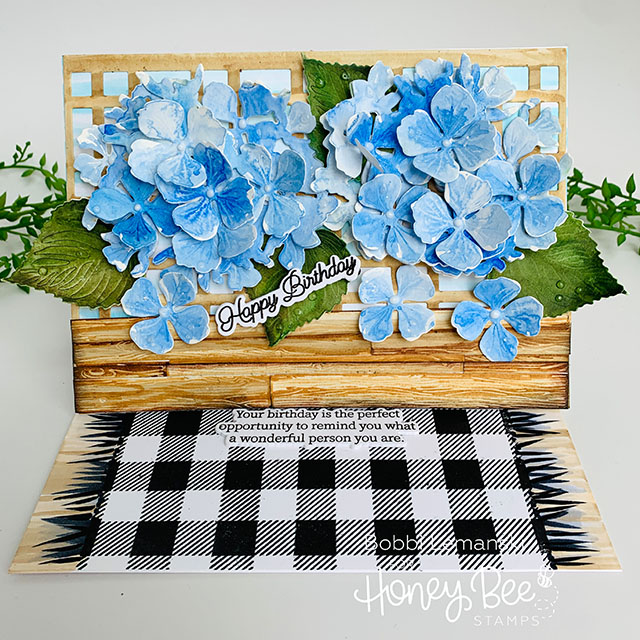
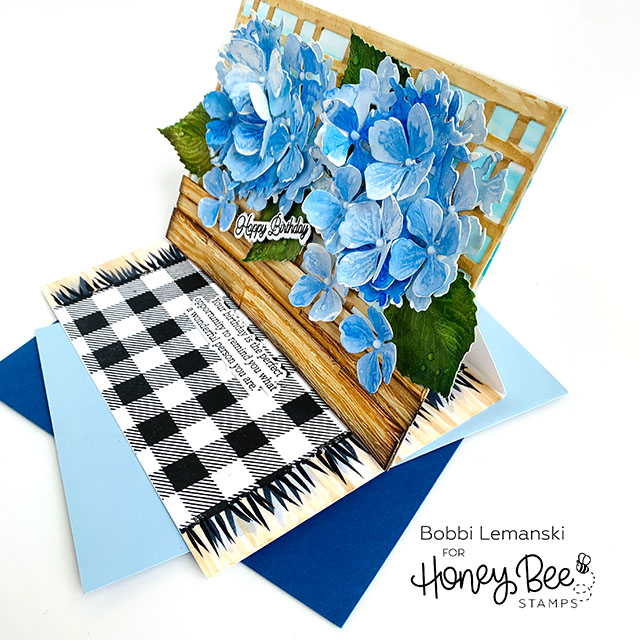
Happy Mother’s Day, Bee friends! It’s Bobbi Lemanski here, wishing all you moms and caregivers a wonderful day! My featured card today is an easel card designed to look like a wooden planter with a trellis backdrop, filled with large clusters of hydrangea blossoms, sitting on a black and white buffalo plaid runner. (Whew! That’s a long description. :)) In its closed position, you see only the planter filled with the beautiful layered hydrangeas, but when the card is opened, the planter is upright, sitting on the textile. It’s pretty and ready to be displayed. 🙂 I used the following Honey Bee Stamps products to make this card:
Lovely Layers: Hydrangeas die set (new)
Inside: Birthday sentiments stamp set and coordinating die set (new)
Buffalo Plaid Background stamp set
Card Preparation

If you are new to easel cards, no worries! This interactive card is very easy to make. Here’s how:
Cut a 10″ X 7″ piece of 80lb cardstock and score in the middle for a 5″ X 7″ card base.
Cut two 5″ X 7″ pieces – one for the card front and one for the interior of the card. Stamp the Buffalo Plaid Background stamp design in black on one. I added some faux woodgrain to the edges, but you could leave the edges white. I also added black and gray fringe edging.
On the other piece, hand draw some light clouds using Copic colors in B000, B00, BG000. No need to be fussy here, most of the clouds will be covered by the trellis die and the flowers. If you prefer, you could use the Wispy Cloud stencil here, too.
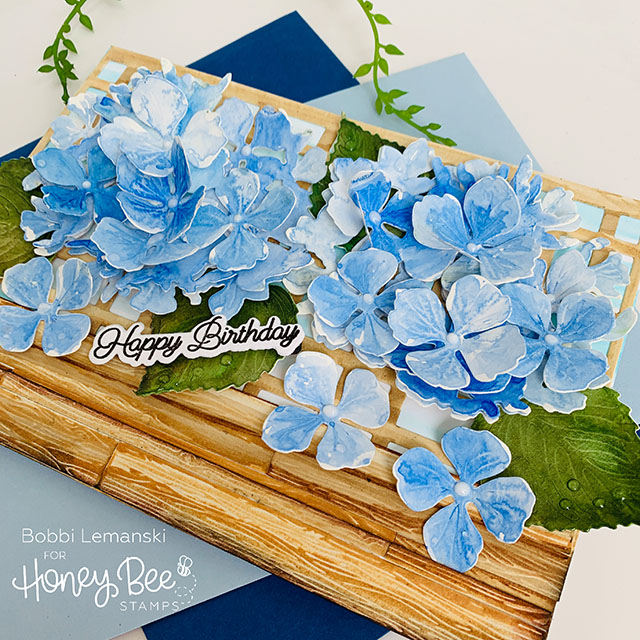
Die cut the Barn Wood Planks and the A7 Plaid Cover Plate die from a white or tan cardstock. Add natural looking graining to them by coloring them in Copics in E57, E55, E50 and E43. Simple strokes of color make these textural boards come to life!
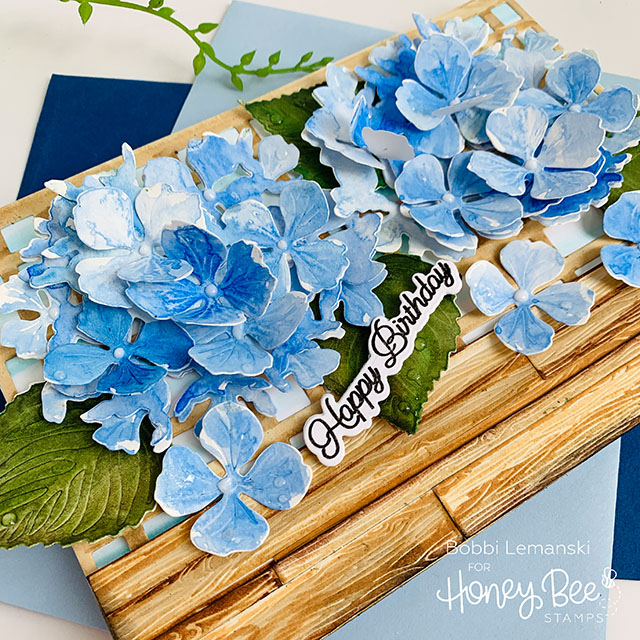
Die cut two sets of the Lovely Layers: Hydrangeas dies (flowers and leaves) from Arches Watercolor paper. Apply watercolor paint to them, allowing them to be varied shades of blue/purple. You can use a pink color, too. Layer the flower pieces to create the large blossoms. I use Bee Creative Precision Glue because it holds watercolor paper together nicely and dries fast. To layer these flowers, line up the interior “holes” in the layers to get them on straight, allowing blossoms to peek out as intended. I cut 3-4 additional single blossoms and leaves to fill in the gaps. Once the flowers were dry, I added white Nuvo Drops centers to them. I also added transparent water drops to the leaves and petals using Glossy Accents. Fold the petals upward for dimension.
Stamp and die cut, in black on white cardstock, the “happy birthday” script phrase and an inside sentiment of your choice from the Inside: Birthday sentiments stamp set and coordinating die set. I die cut three additional cut layers of the inside sentiment cutout and stacked and glued them together. This will be the resting ledge for the easel card inside.
Card Assembly
Now it’s time to put it all together! Attach the die cut trellis to the cloudy sky front panel using the Bee Creative Precision Glue. I used this glue to position all of the elements in place. Add the planks to the bottom of the front panel to create the planter.
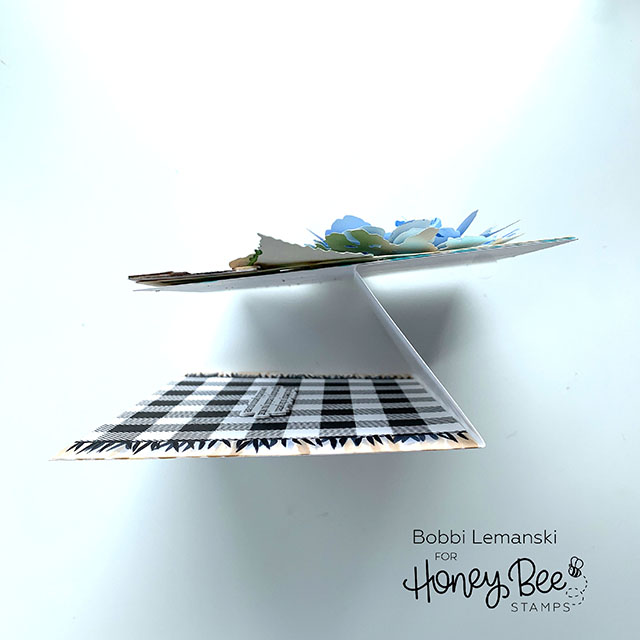
Score the card base top panel at 2-1/2″ (in the middle of the 5″ height) and fold upward to create a backwards “z” shape as seen in the photo. Attach the front card planter panel to the upward folded section, only. Inside the card base, attach the buffalo plaid interior panel. Fully score all the folds so that the card folds flat.
Attach the “happy birthday” phrase to the front. Position and glue the inside sentiment on the Buffalo plaid to act as the resting ledge for the planter. Try a few places until you like the angle. Here’s a quick look at the card in its upright position. Use an A7 envelope for this card.
Ready to order? Here’s a link to shop! If you decide to place an order, please use the links in this post so that Honey Bee Stamps knows what inspired you today!
Thanks for stopping by today. If you want to see more ideas and inspiration from me, subscribe to my blog, BobbiHartDesign.com. I’ll send you updates on new posts! You can also find me on Instagram as @BobbiHartDesign and on Facebook as BobbiHartDesign.
Bobbi Hartmann Lemanski, Bobbi Hart♥ Design, Adding h♥art into every design
One response to “Birthday Blue Hydrangeas”
What a beautiful card! I’ve never made an easel card. I have to try it.