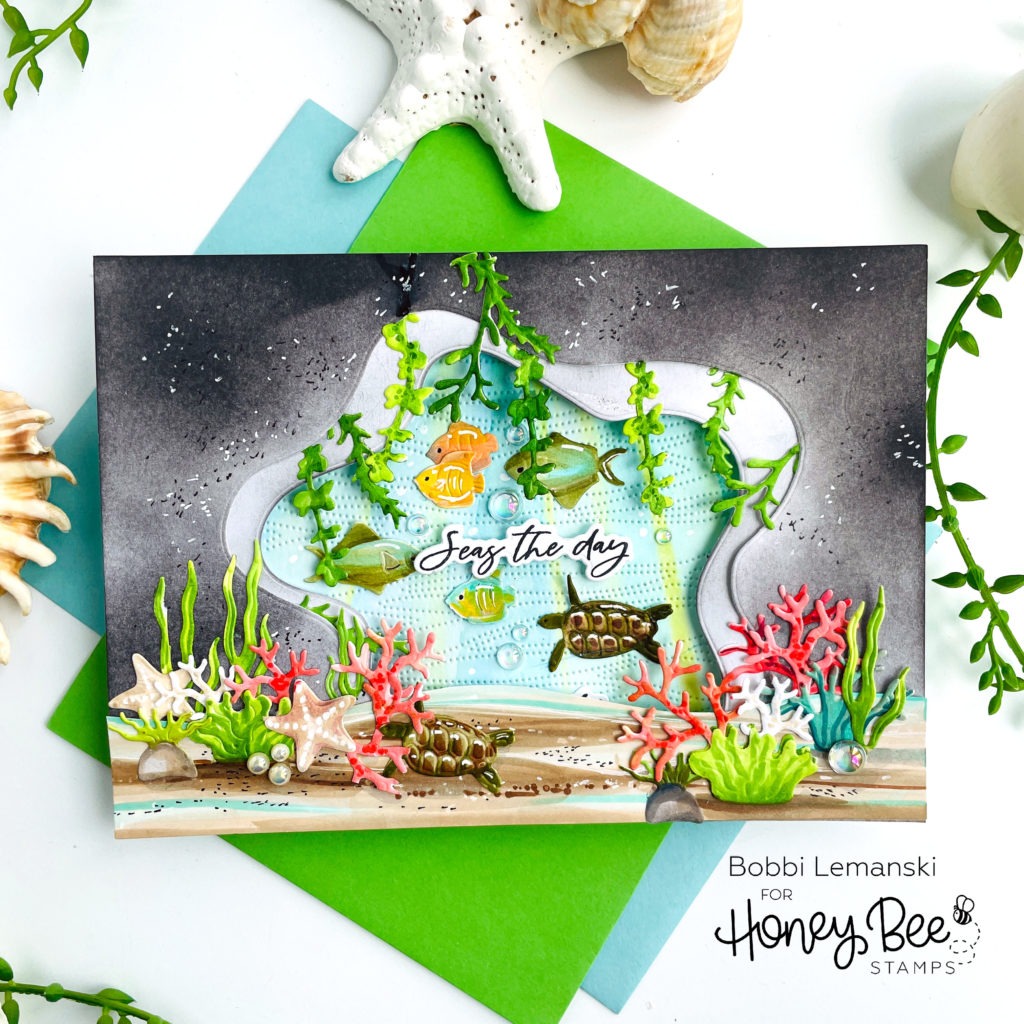
Hello friends. I hope you have been enjoying seeing all the wonderful inspiration using the Perfect Day release products these past few weeks. It’s Bobbi Lemanski here sharing a fun idea using the Ocean Deep Scene Builder die set. Instead of showing a top-down view of the ocean, I used it (in a vertical orientation) as an underwater cave instead. I think it works great this way! For this ocean scene, I’m using the following Honey Bee Stamps products:
Ocean Deep Scene Builder Honey Cuts dies
Succulent Garden Builder Honey Cuts dies set
Seas the Day stamp and coordinating die set
Waves A2 Pierced Cover Plate die
Waves Layered Stencil – Set of Two
The featured project below is made from Neenah 80lb Solar White cardstock for the card base and card front panel. All of the black ink stamping was done using Honey Bee’s Bee Creative Intense Black Ink. I use Honey Bee Stamps Bee Creative Precision Glue for adhering my elements together. My card is 5″ X 7″ in size.
How to Make this Card
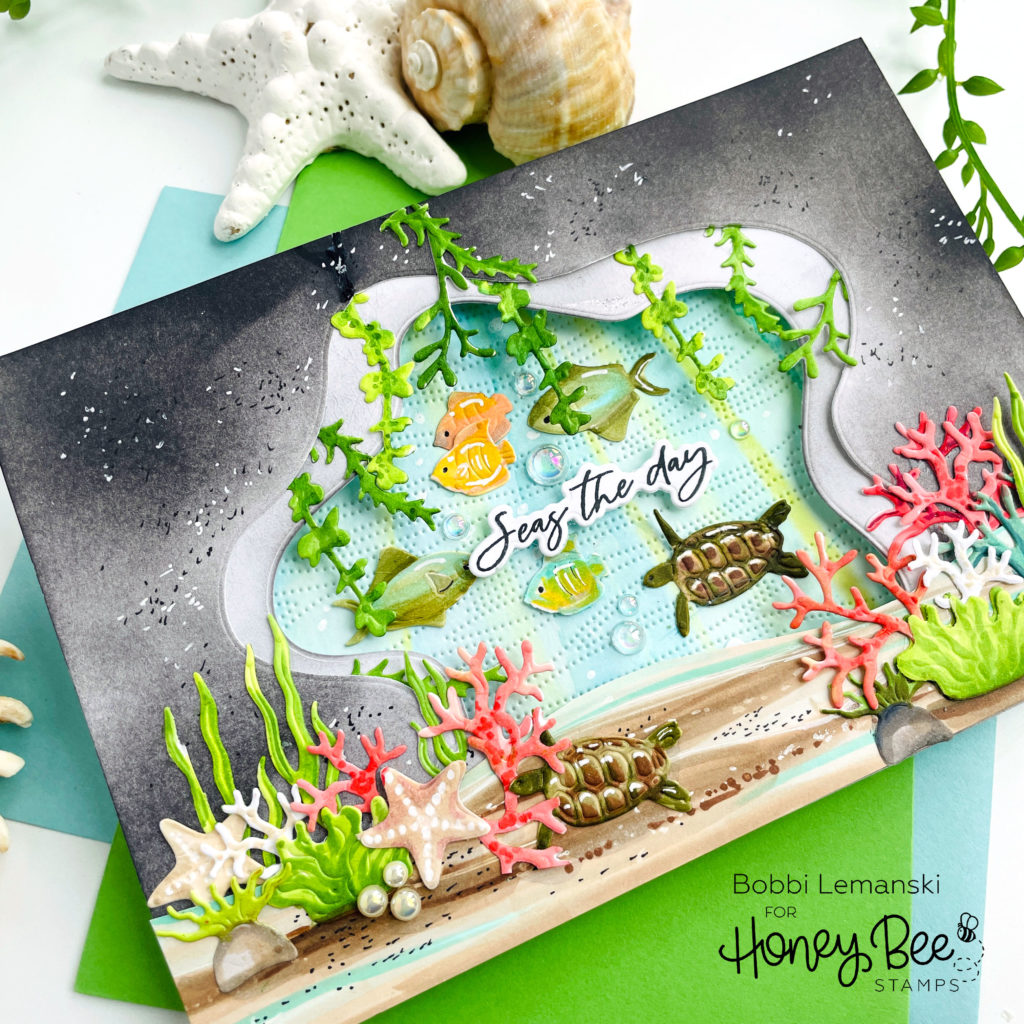
I used the Ocean Deep Scene Builder Honey Cuts dies to cut out the largest two layers of the openings. On the top layer, using a Blender Brush, I blended on Distress Oxide Ink in Black Soot, making sure to have varying levels of black ink on the cardstock, similar to a rock formation. I added random dots using a fine-tip black marker and a Gelly Roll white gel pen to create some texture. Using my brush again, I lightly added black ink to the next layered opening, keeping it very light gray. To make the ocean floor, I used a strip of white cardstock and hand cut some soft curves. I colored it using Copic Markers in E44, E43, E42, BG10, BG11, and W2. I added specks of sand and shells using my white gel pen and black marker. I attached the sand floor to the bottom of the openings to complete the front panel background design.
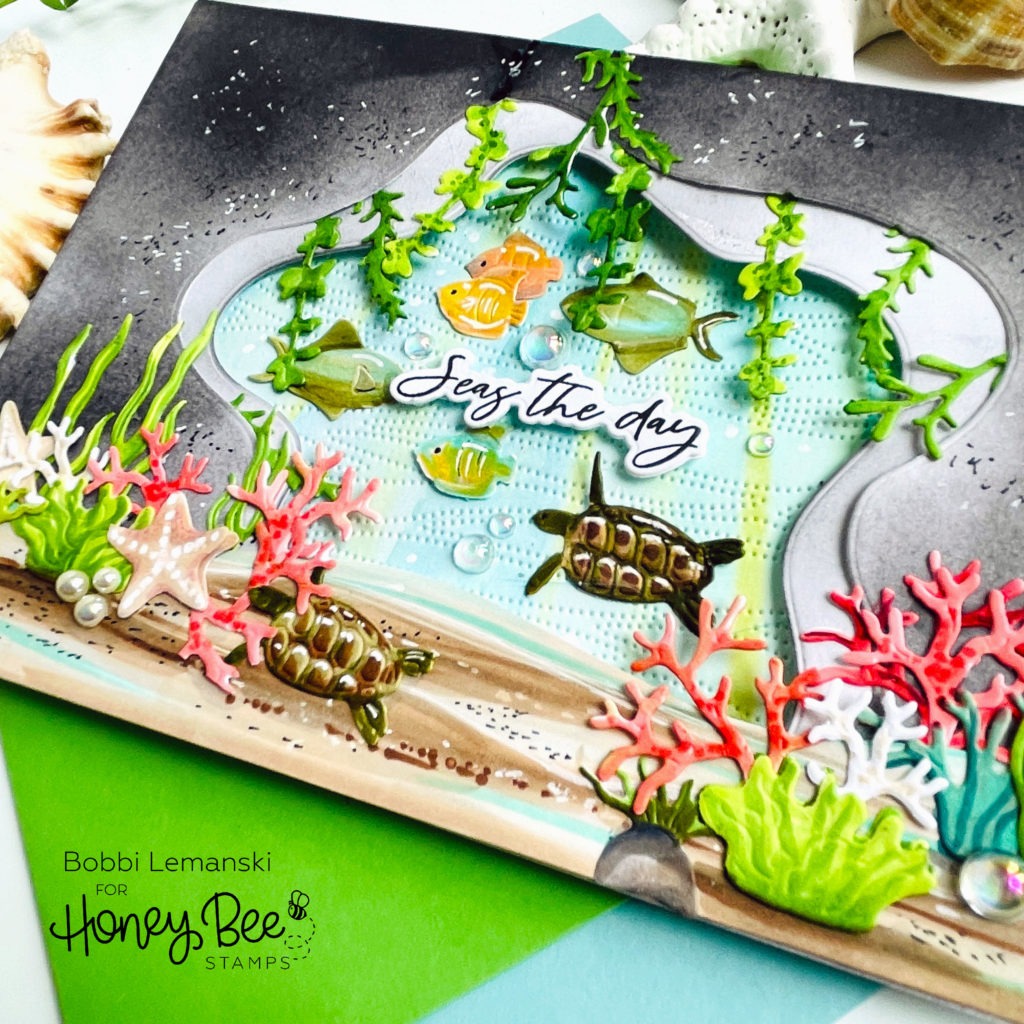
I die cut all the fun coral, sea life, shells and more from the Ocean Deep Scene Builder Honey Cuts dies. Each one was colored using Copic Markers in colors R17, R22, R20, YG67, YG17, YG03, YG00, YG99, YG93, E43, E44, E04, E43, E42, E40, BG72, BG11, Y19, Y24, and YR15. I adhered the coral, starfish and other ground items to the front panel opening of the cave. I added some Warm Pearls to the front for a little bling.
I also cut several hanging greenery from the Succulent Garden Builder Honey Cuts dies set. I wanted this greenery to hang down from the rock, over the cave opening. I colored these in greens: YG67, YG17, YG03, and YG00. I tucked them between the rock layers of the cave. Since these show through on both sides, I colored the back side of the vines, too.
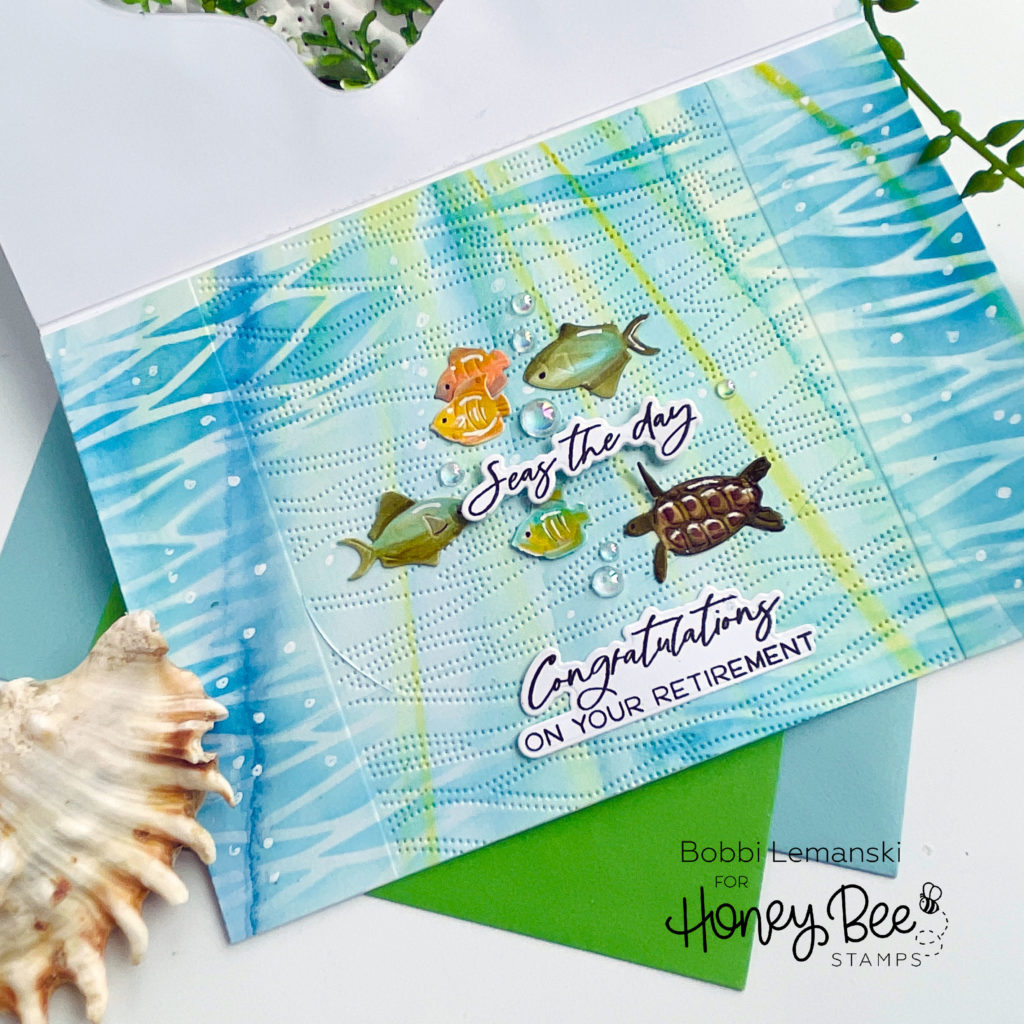
On the card’s inside panel, I created the look of water using watercolor paints on Canson XL watercolor paper. I used blues and greens and added streaks of yellow for sunlight beams with my paintbrush. I ran the 5″ X 7″ panel through my die cutting machine with the Waves A2 Pierced Cover Plate die centered in the panel. Next, I stenciled more waves on the sides using the Waves Layered Stencil – Set of Two and Mermaid Lagoon Distress Oxide Ink. I finished the inside background scene with some white dots using my white gel pen.
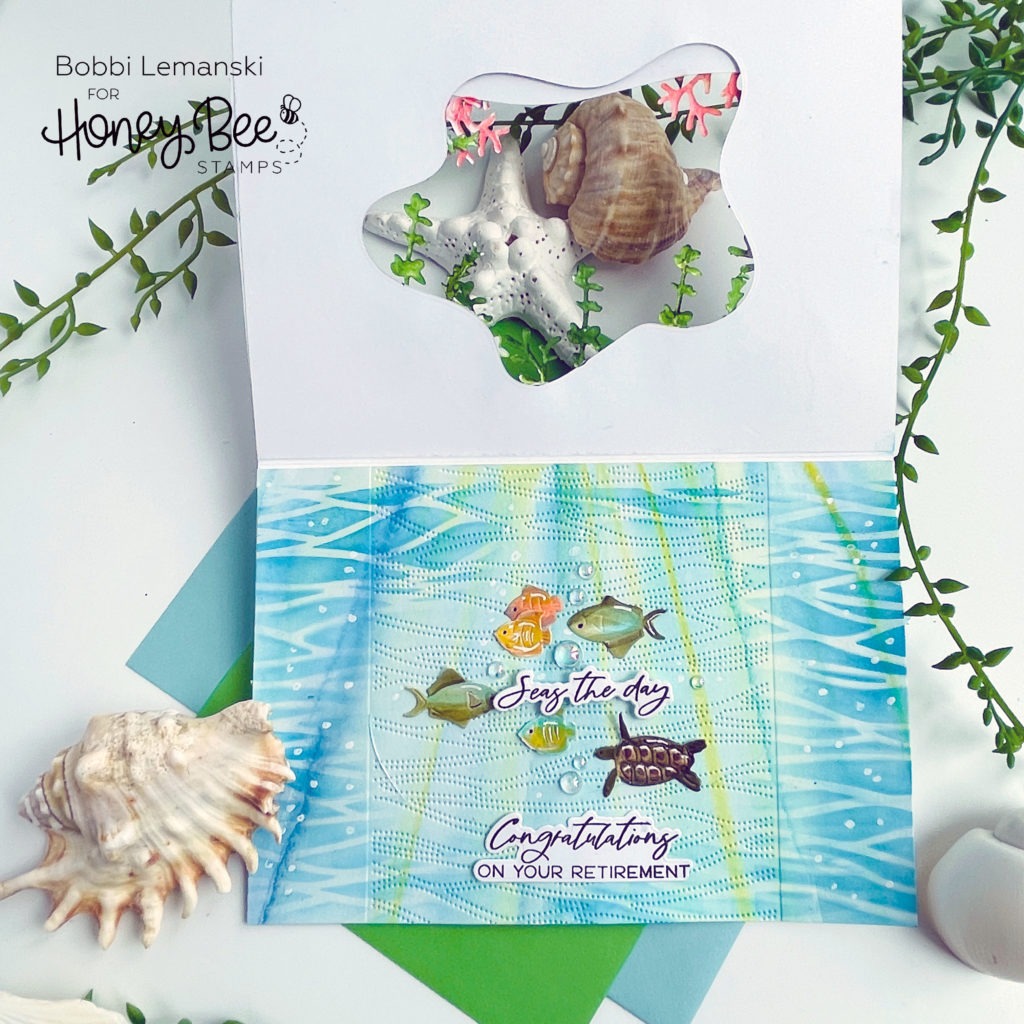
I added my colored fish, centering them in the front cave opening, and some dimensional bubbles using Dew Drops Reflection AB. I added two phrases to the card using the Seas the Day stamp and coordinating die set. “Seas the day” shows through to the front and the congratulatory phrase is hidden when the card is closed.
You can see the opening and how it centers over the fun fish. You can shop the entire Honey Bee Stamps Perfect Day release here. If you decide to place an order, please use the links in this post so that Honey Bee knows which ideas inspired you!
Thanks for stopping by today. If you want to see more ideas and inspiration from me, subscribe to my blog, BobbiHartDesign.com. I’ll send you updates on new posts! You can also find me on Instagram as @BobbiHartDesign and on Facebook as BobbiHartDesign.