
Hello, Bee friends! It’s Bobbi Lemanski here with an interactive, Halloween-themed card for the haunting holiday ahead! The apothecary cabinet doors open as you lift the top flap. It’s like witch magic! I am using a number of new products from the Spooktacular release by Honey Bee Stamps including:
Happy Halloween stamp set and coordinating die set
Perfect Potion stamp set and coordinating die set
Halloween Potion Labels and coordinating die set
Hocus Pocus stamp set (I did not use the dies, but here is the link to the coordinating die set.)
The featured project below is made from 100lb black cardstock for the card base, door and hinge pieces. I am also using faux wood paper from the Grain and Grunge paper pad. All of the black ink stamping was done using Honey Bee’s Bee Creative Intense Black Ink. I use Honey Bee Stamps Bee Creative Precision Glue for adhering my elements together. This glue is great for keeping the hinges secure. My card is 5″ X 7″ in size when in its closed position. Now for the details…
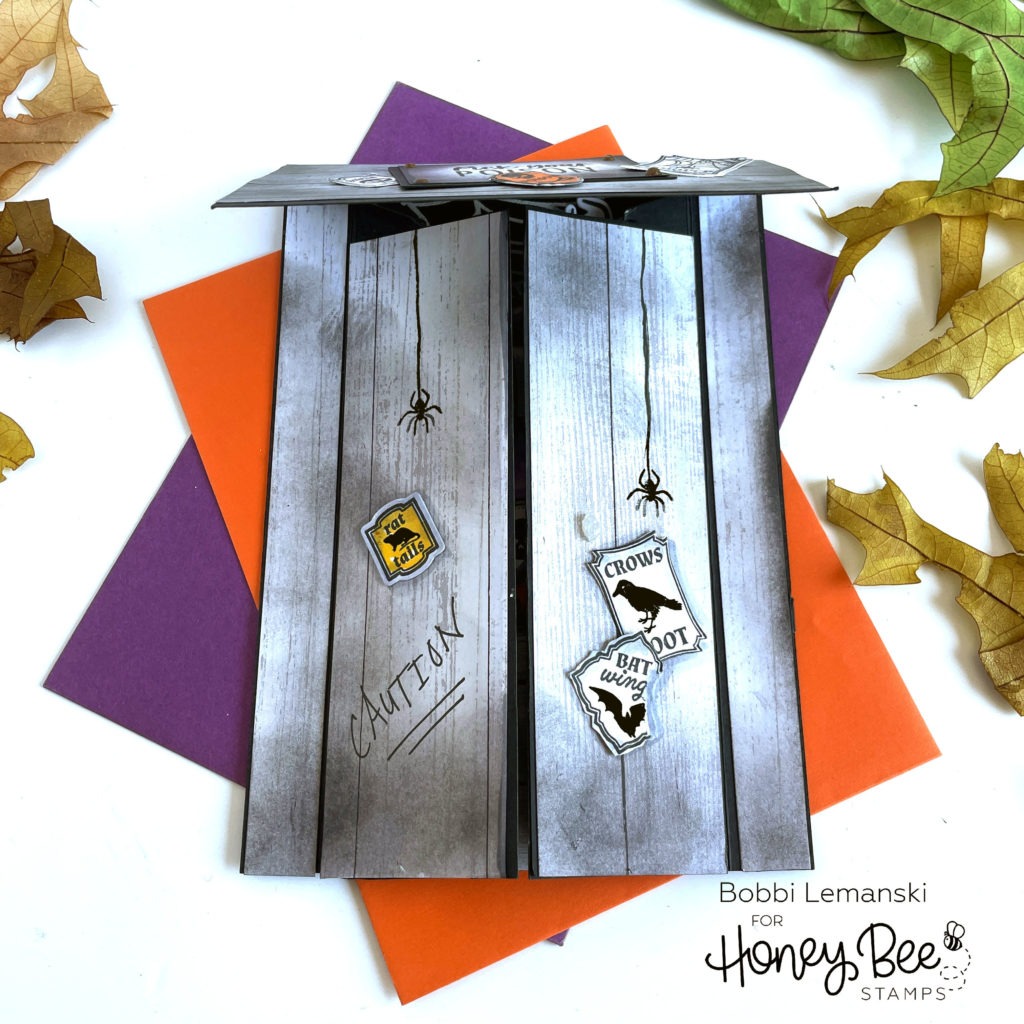
On the outside of this 5″ X 7″ card, I made the front look like an old wood, grungy cabinet with a top pull-up door and two, side-by-side bottom doors. I used papers from the Grain and Grunge paper pad to cover the base. When the top cabinet door is pulled up, the bottom doors open. Hocus, pocus… it’s almost like magic!
See the video I shared on Instagram to show the card in action! (Note: I use white cardstock in the video for illustration purposes, only. I used black cardstock for this card.)
To make the interactive mechanism, I created a base with the top door, two side doors, and two hinges using these cut pieces:
Cut the following pieces from black cardstock:
- Cut the card base 5″ wide X 10″ tall and score 3″ from the top to create the 5″ X 7″ card base back and the 3″ pull-up door on the front.
- Cut the two side-by-side, bottom doors measuring 1-3/4″ wide X 6-1/4″ tall each.
- Cut two hinges measuring 1-1/2″ wide X 7-3/4″ tall each.
Cut the following pieces from woodgrain pattern paper from the Grain and Grunge paper pad:
- Cut the top door front panel 5″ wide X 2-3/4″ tall (Planks should follow the direction of the width.)
- Cut two hinge cover pieces measuring 1/2″ wide X 7″ tall (Planks should follow the direction of the height.)
- Cut two bottom doors measuring 1-3/4″ wide X 6-1/8″ tall (Planks should follow the direction of the height.)
- Cut the inside drawers piece 5″ wide X 2-1/2″ tall Make sure to choose a paper with horizontal planks so they look like drawers inside the apothecary cabinet. (Planks should follow the direction of the width.)
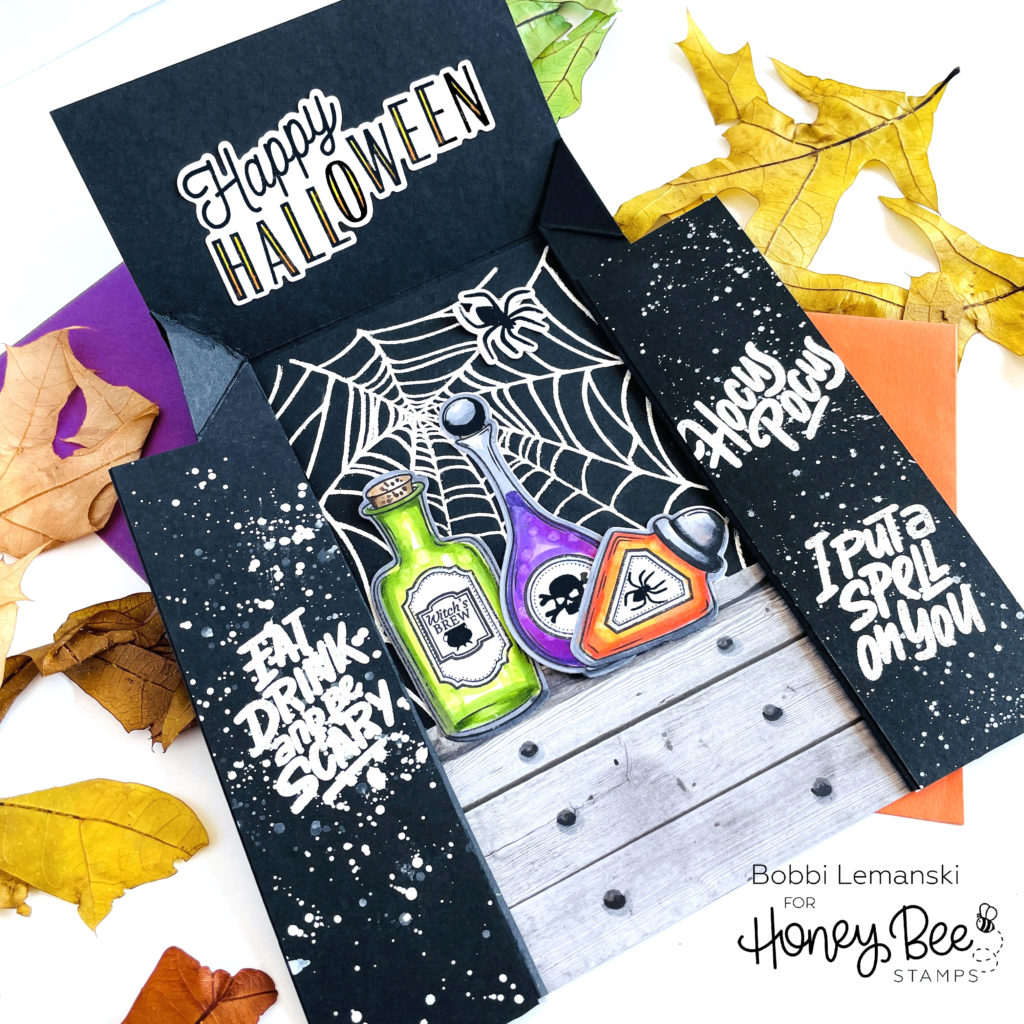
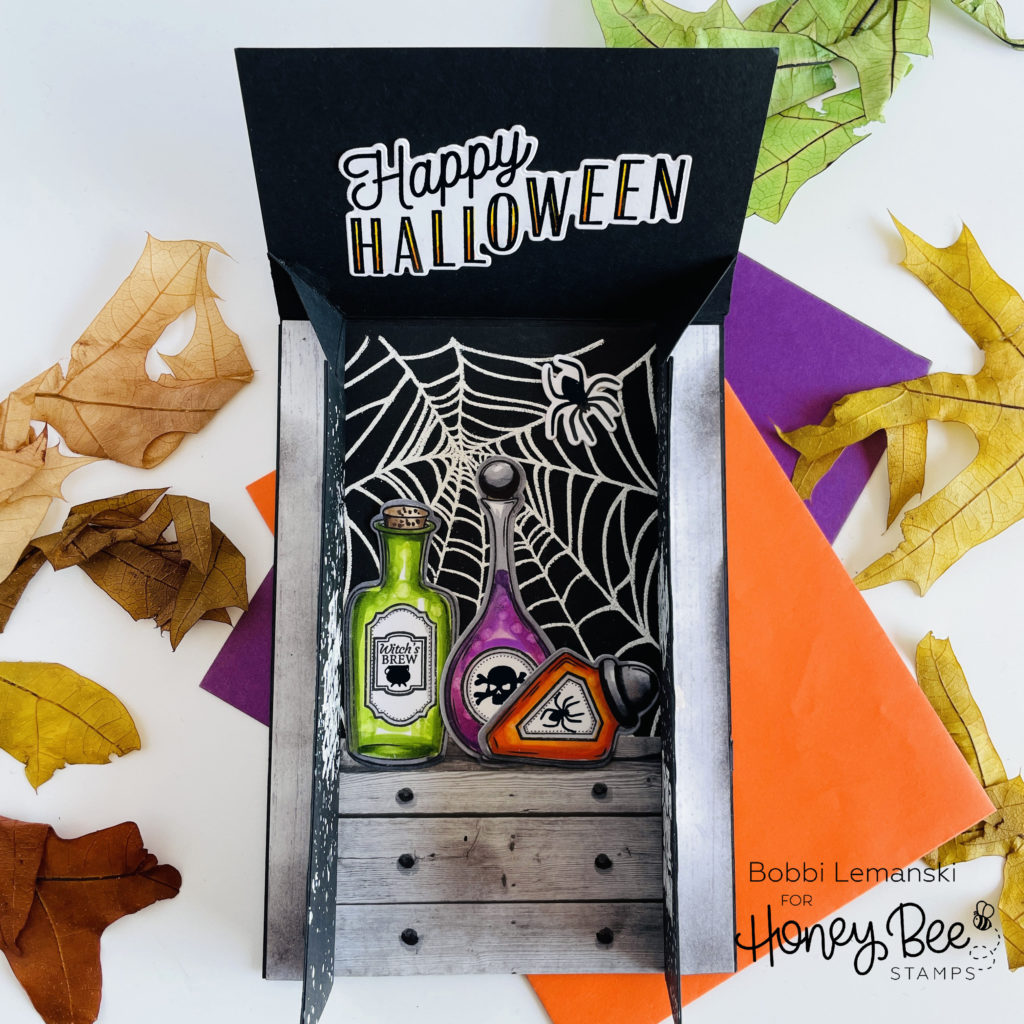
Before assembling the interactive base, I stamped and embossed in white, the spider web on the inside panel of the card base, right below the 3″ score line. It’s important to do this before assembling the card so that it is a flat piece for stamping/embossing. I also stamped and heat embossed the three phrases from the Hocus Pocus stamp set and splattered them with Dr. PH Marten’s Bleed Proof White Ink on the black side-by-side door pieces. I set them aside to dry.
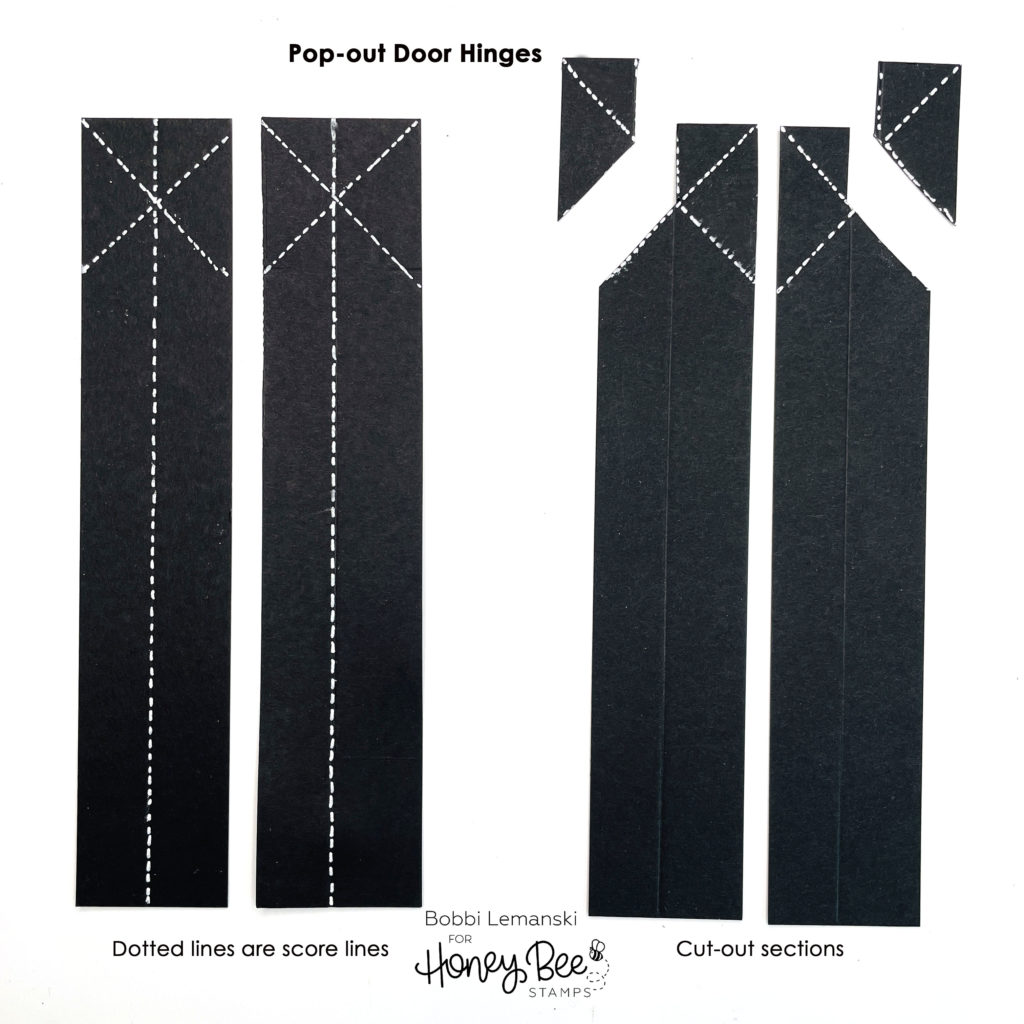
To assemble the card, I first made my hinges. Everything “hinges” (:)) on these pieces so follow these steps:
- I scored down the middle of the pieces at 3/4″ in from both long sides. (That’s right in the middle of the 1-1/2″ width.) For illustration purposes only, I added white dotted lines in the photo above to show where to score on the black pieces.
- I marked 1-1/2″ down from the top on both the right and left sides of the hinge pieces and scored from these points to the upper, opposite top corner, creating an “X” design. The center point of the X should intersect right on the center score line from step one.
- I cut out a section of the X design as shown on the photo above from each piece. You’ll want to bone-fold on all of the score lines to prepare the hinges for duty! 🙂
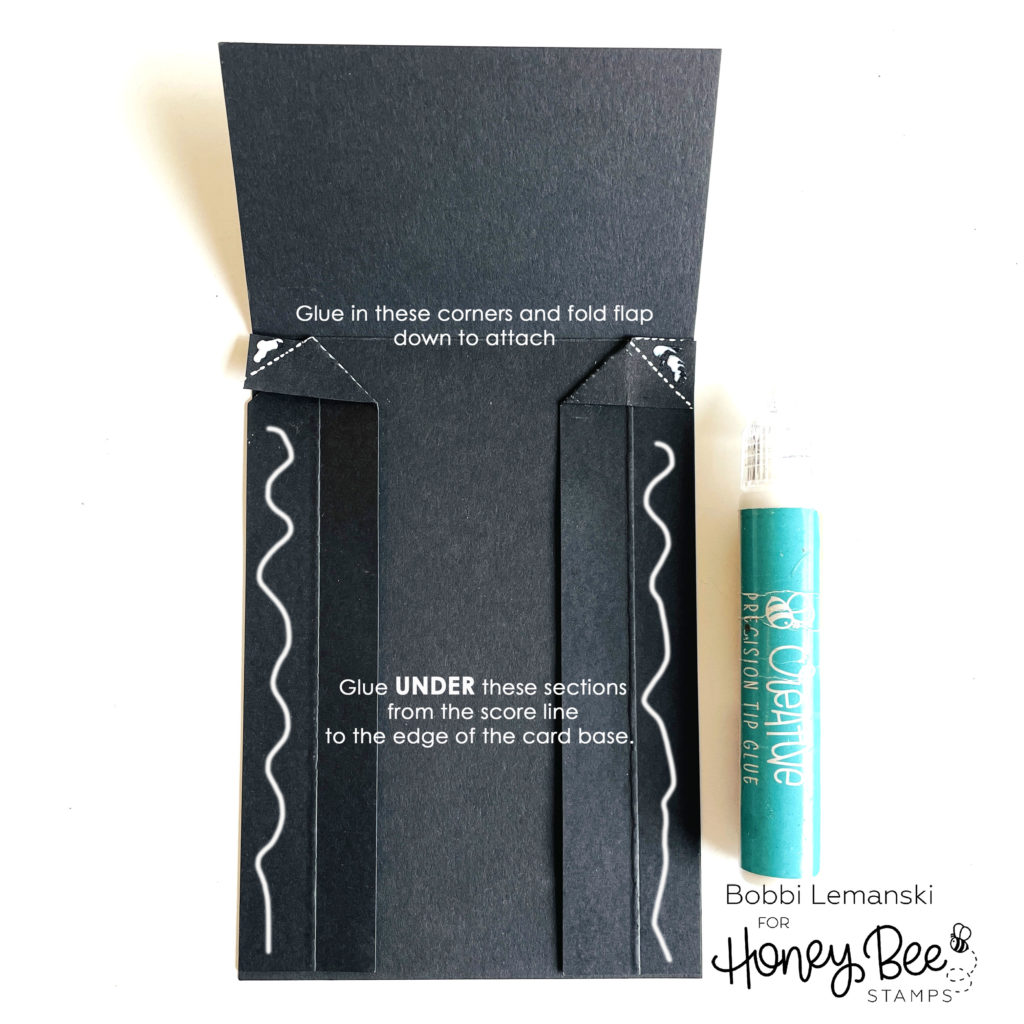
To attach the hinges, I lined up each hinge with the cut-out side on the outside/ outer edge. I folded the hinge pieces to create an arrow or point at the top. I made sure to fold the top piece down and over so that the point lines up with the card base’s 3″ fold line. (See illustration.) I put glue on the underside of the “cut-out” sides of both the hinge pieces and lined them up with the outer edge of the card base to secure them in place.
Once the sides were glued down, I added glue to the triangular sections as shown above and folded the flap down to secure. It’s important to keep weight on them until the glue dries. I use Honey Bee Stamp’s Precision tip Glue because it is strong and dries fast for this application.
I attached the cabinet doors, attaching the black embossed side on the inside and the pattern plank paper on the outside, sandwiching the 3/4″ hinge flap . I used glue again to adhere them in place. You want them to be strong!
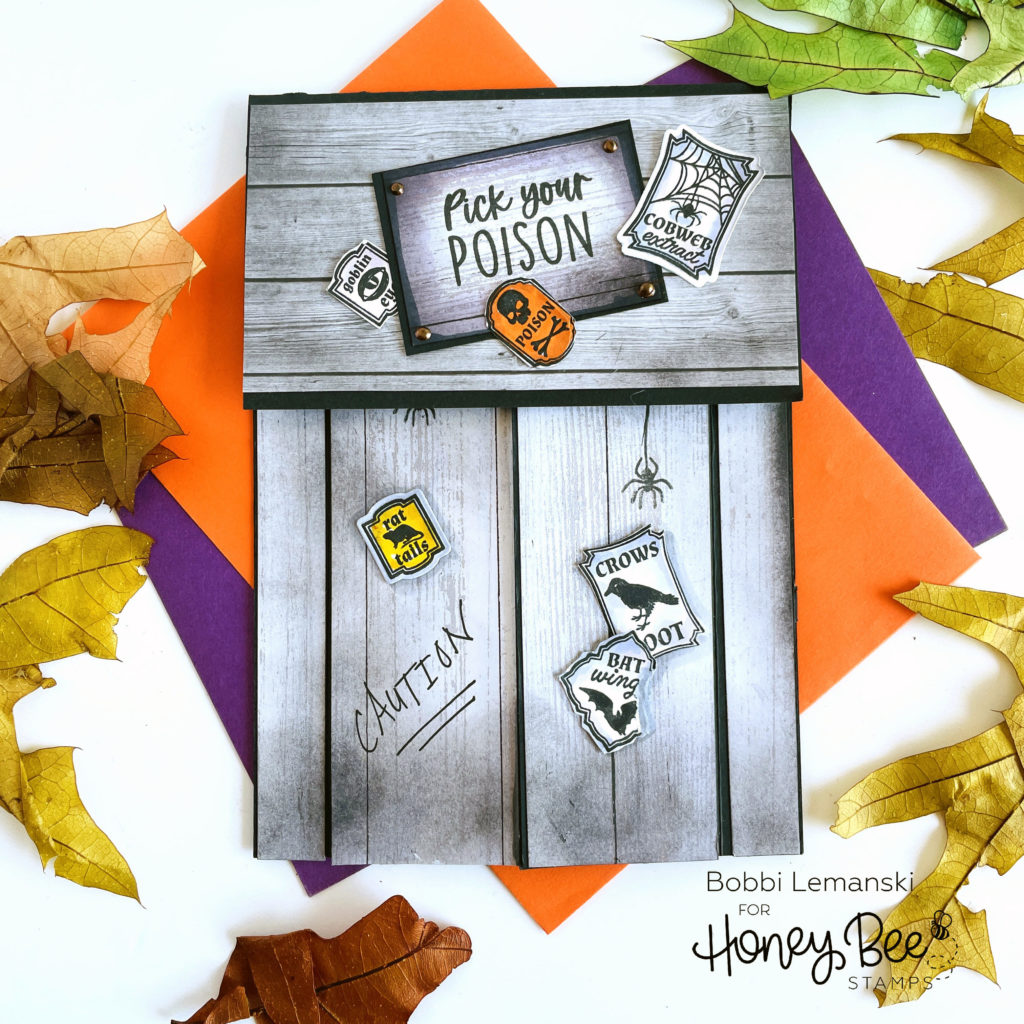
I also attached the top cabinet faux wood door piece and the hinge cover wood pieces on the outer edge to make the front of the cabinet look like it is all wood. I added fun little potion labels from the Halloween Potion Labels and coordinating die set and spiders from the Happy Halloween stamp set to the outside for a cool effect. I also hand wrote the word “caution” on the outside of this potion cabinet. I made a sign for the top cabinet door using a sentiment from the Hocus Pocus stamp set and added bronze nail heads in the sign’s corners using Dirty Bronze Nuvo Crystal Drops.
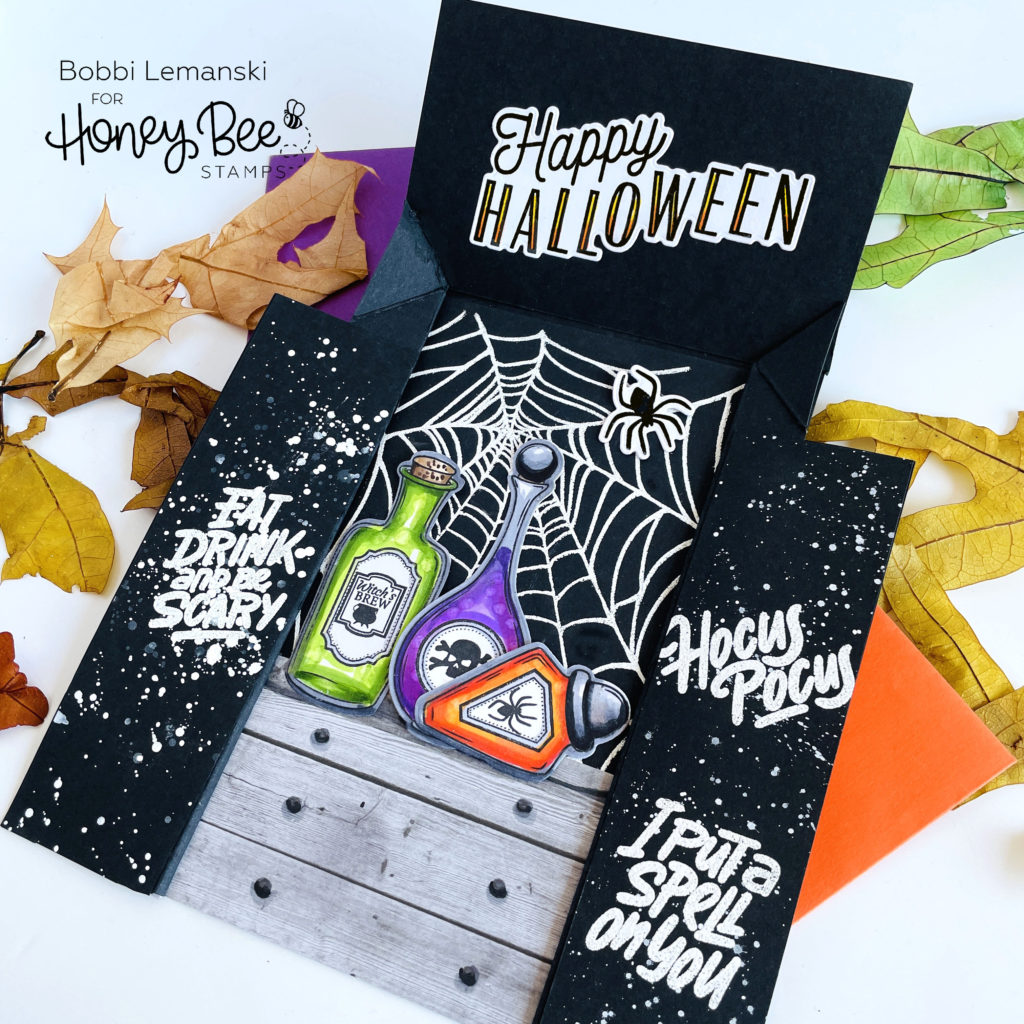
Inside, I added the potion bottles from the Perfect Potion stamp set and coordinating die set to the shelf and a spider to the cobweb from the Happy Halloween stamp set. I hand drew in six cabinet knobs using my Copic 100 and shaded below each one with a C5 and C3 to make them look dimensional.
I hope you like this interactive card I’m sharing today. You can shop the entire Honey Bee Stamps Spooktacular release here. If you decide to place an order, please use the links in this post so that Honey Bee knows which ideas inspired you!
Thanks for stopping by today. If you want to see more ideas and inspiration from me, subscribe to my blog, BobbiHartDesign.com. I’ll send you updates on new posts! You can also find me on Instagram as @BobbiHartDesign and on Facebook as BobbiHartDesign.
One response to “A Witch’s Apothecary Cabinet”
Fantastic!!! So fun!!