
Happy new week friends! It’s Keiko from Happy Tree Studio today and I have this cuuute slimline scene card featuring the new Santa’s Village set to share with you! I just adore all the images in the set especially the pair of little elves!!
For this scene card, I wanted to use some muted colors instead of more bright pastel colors I usually go for. Since my Copic collection is limited (I only have two red markers), I decided to try coloring on gray card stock to make the colors less vibrant. All the images are from Santa’s Village except the little North Pole sign which is from Toy Store House Builder Add-On. I stamped all the images on gray card stock with gray alcohol marker friendly ink and colored them with Copics. TIP: Making a color swatch on a scrap of the same gray card stock helps when choosing the right color since the colors look completely different from how they look on white card stock.

After die cutting the colored images using the coordinating dies, I added some white gel pen details and black gel pen to the eyes. I also added Glossy Accents to the boots. belts and glasses. To add snow to the trees and houses, I applied some embossing ink (clear sticky ink) and covered them with white puff embossing powder.
For the background, I die cut the slimline panel and the cute scalloped frame using Slimline Sentiment Eyelet die. I used the same gray card stock for these and die cut an additional scalloped frame from white to layer on top. The snowy hills are cut with Horizon Slimline Borders die. In order to add two more hills in front, I die cut another panel and then die cut two additional wavy hills. To the three snowy hills, I lightly blended blue ink to the bottom and white pigment ink to the top. To the sky portion, I added grey ink from the top.
To add more texture to the sky, I white heat embossed some trees from Santa’s Village set and snow flakes from Jingle All the Way set. Because I don’t know when to stop (LOL), I added some falling snow using Winter Wonder Background stencil and white puff embossing powder. The sentiment is also from the Santa’s Village set and I stamped it on one of the hills with dark gray ink.
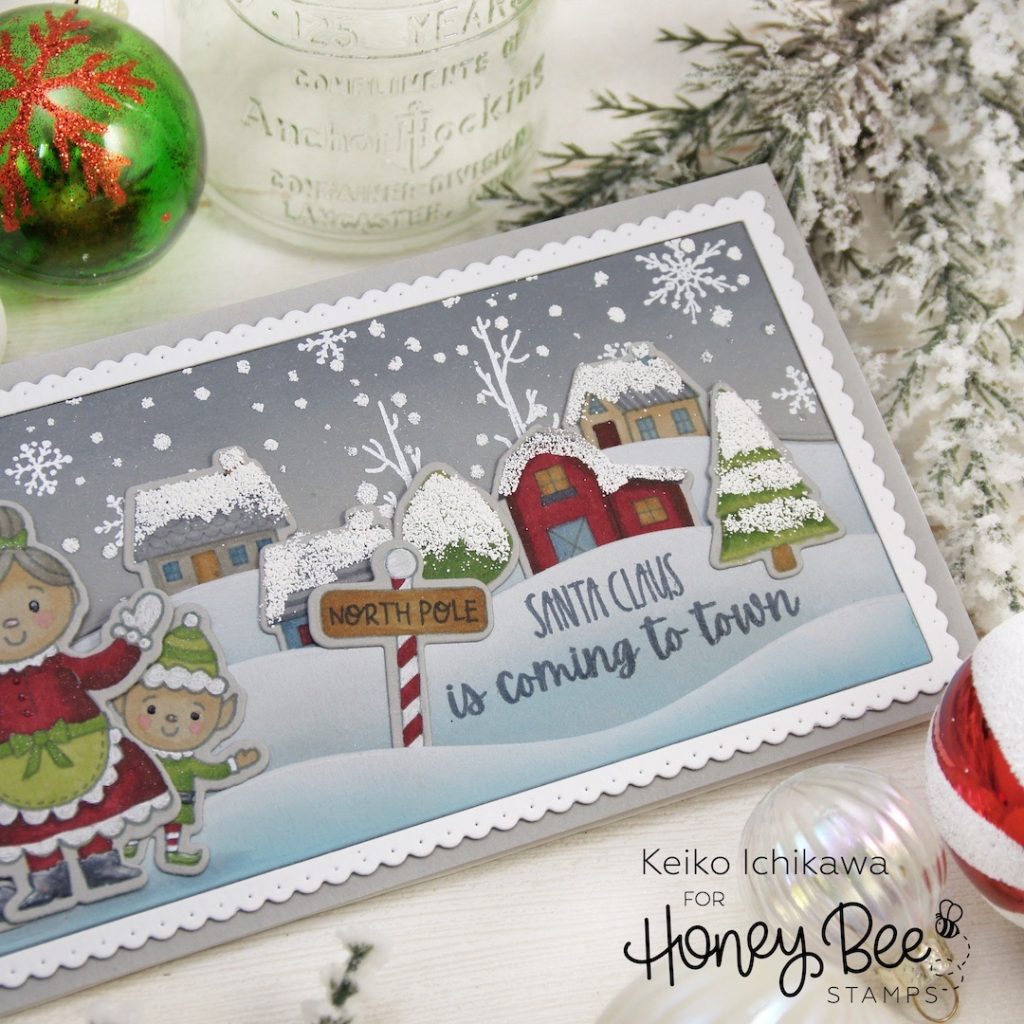
To assemble the card, I adhered the background panel and the scalloped frame to the gray card base and added the hill borders with some foam adhesives. TIP: In order to tuck in all the houses and trees, leave the edges of these hills free of foam tapes. I then arranged all the images and adhered them with liquid glue and foam tapes.

Thank you so much for stopping by today! Have a wonderful week!!

4 responses to “Santa’s Village Slimline Card”
Lovely muted tones on this fun winter scene.
Thank you Andre! I love the different look I could achieved by simply using a gray card stock!
l love this card…Santa and Mrs. Claus are wonderful! so is the whole scene!
Thank you Barbara-Jean!! Yes, they are the cutest!!