It feels like forever since I have shared a post here. It has been wonderful to have a break during the holidays but it is time to climb back onto the creative saddle and get inky! Today’s card features several of the new stamps and die sets, including the new Mae The Mouse Stamp Set. Let’s get started!
____________________
(Products highlighted in teal are active links to the shop.)
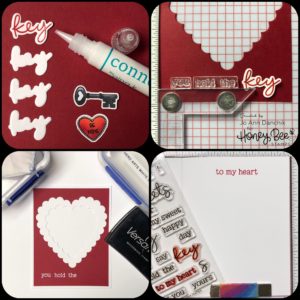
I stamped Mae…the mouse, the key, and the heart with Copic friendly Gina K Designs Amalgam Ink, onto #80 Neenah Cardstock. Adding that little tooth just makes me smile! They were colored using copic markers. Oddly, it is hard to stop coloring, even when I know that the bottom half will be covered and not needed! LOL
Mae…the mouse: W0, W1, W3, W5, W7, R20
Key: C1, C3, C5, C7
Heart: R24, R27, R29, W2
Eyelashes were added with a Copic .003 Multiliner. The eyes were filled in with Black and White Gelly Pens. The pieces were die cut using the coordinating Mae The Mouse Die Set.

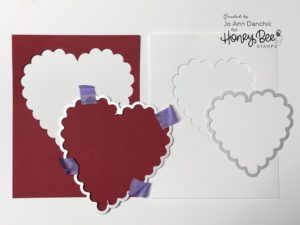
A heart was cut from Simon Says Stamp Schoolhouse Red Cardstock, using the new Scallop Hearts Die Set. A smaller heart was used to cut an opening in white cardstock.
The sentiment was taken from the Brie Mine Stamp Set. I started by stamping the word “Key” with Wendy Vecchi Archival Red Geranium Ink. It was die cut using the coordinating Brie Mine Die Set. I cut three additional pieces and glued them together using Gina K Connect Glue.
I lined up the sentiment for the front of the card onto the red panel. Using the MISTI corners helps to get everything straight. It was stamped using Versamark Ink and heat embossed with Hero Arts White Detail powder. The red cardstock really shows stray powder so be sure to use an anti static powder tool first.
I stamped the rest of the sentiment on the inside of the card base.
I glued the two panels together and tucked the mouse inside. Scotch foam tape was added to the back. Yes, I know…I use a lot of tape! 🙂
I was not home at the time that I made this card. It felt like I had packed everything I own, but obviously I did not. I didn’t have access to a stamp or stencil with dots. Also, I didn’t have any paste with me. I improvised and made dots all over the red heart cutout with the White Gelly Roll Pen, that I did have with me.
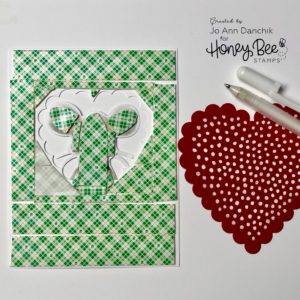
To finish, the red heart was added to the back and everything was glued down to a #110 Neenah Cardstock cardbase.
I really love this mouse set and have several more projects ready to share with you in the weeks to come!

As always, thank you for sharing a bit of your time with me today on another creative journey. You can find me on Instagram at jadanchik or on my blog at jadanchik.com.
Joyfully, Jo Ann
Supplies used:
The additional products used are listed below for your convenience:
One response to “Creative Sundays With Jo Ann: Key To My Heart”
Love this card. I like how you show us that there is more than one way to achieve a design you are looking for. Thanks for sharing your talent with us today.